How to Transfer Data to New iPhone (After Setup Included)
Don’t know how to transfer from old iphone to new iphone when switching from old iPhone to the latest iPhone 15? Check this post now and easily grab 5 simple methods on how to transfer iPhone to iPhone (iPhone 15 supported), with or without iCloud/iTunes.
iPhone to iPhone Transfer Tips
Transfer/Sync iPhone
Transfer Media Data
AnyTrans – Transfer Data to New iPhone 15
Free download AnyTrans to start moving data from your old iPhone to your new iPhone 15, including contacts, messages, photos, apps, etc.
Free Download100% Clean & Safe
Free Download100% Clean & Safe
Free Download* 100% Clean & Safe
Speaking of mobile phones, Apple is definitely the industry giant. Every time a new series of iPhones is released, many people will place orders in the first place. And iPhone 15 series was released in Sept. this year. Most iPhone users already have the iPhone so data transfer from old iPhone to new iPhone, like transferring contacts to the new iPhone is quite necessary at present.
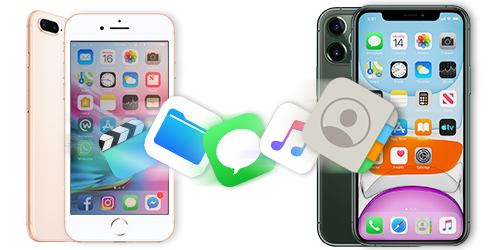
Transfer Data from iPhone to iPhone 15
To solve this problem, Apple itself came up with many solutions, such as iTunes (Finder), iCloud, Quick Start, and ‘iPhone Migration’ after iOS 12.4. All of these methods are meant to make it easier for users to set up a brand-new iPhone, though, they still have their own pros and cons. Here in this article, we will introduce all the possible ways to transfer everything from iPhone to iPhone (iPhone 15 included). These solutions are also supportive when transferring data to new iPhone after setup.
Transfer Data from iPhone to New iPhone with Quick Start
Since most of the iPhones are running iOS 11 or later now, we suggest you use Quick Start to set up your new iPhone and transfer the files from your old iPhone to it. Quick Start is an iPhone-to-iPhone transferring tool developed by Apple.
With this tool, you can set up a new iOS device quickly using information from your current device. Check the steps of transferring iPhone data with Quick Start:
Step 1. Activate Quick Start on Your New iPhone
Turn on your new iPhone and bring it near your old device. The Quick Start screen will offer the option of using your Apple ID to set up your new iOS device.
Step 2. Pair Your Old and New iPhone
Tap Continue, and wait for an animation to appear on your new device. Hold your old device over the new device, then center the animation in the viewfinder. Wait for a message that says Finish on New [Device Name], and then enter your old device’s passcode on your new device.
Step 3. Set Up Face/Touch ID on iPhone
Set up your Face ID or Touch ID on the new iPhone, then enter your Apple ID password on your new device. If you have multiple iDevices, you need to enter all their passcodes.
Step 4. Restore from iCloud Backup
The new device will give you the choice of restoring apps, data, and settings from your most recent iCloud backup or updating your current device’s backup and then restoring. Just select one backup that contains the data you want to use to set up your new iPhone. You can also choose whether to transfer iPhone settings.
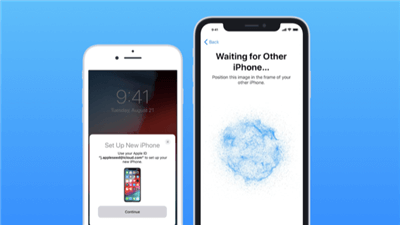
iPhone Quick Start
How to Transfer Data to New iPhone After Setup
# 1. AnyTrans – iPhone to iPhone Data Mover
If Quick Start is not working, and, you want to transfer iPhone to iPhone after setup, here comes AnyTrans. It is an iPhone transfer software that allows you to transfer everything from an iPhone to a new iPhone, without resetting. Check its main features and have a free try on AnyTrans now.
- Transfer the whole data – with AnyTrans, you can transfer contacts, photos, messages, videos, music, ringtones, and other iPhone data from your old iPhone to your new iPhone 15.
- Transfer Apps to new iPhone in 1-click – AnyTrans moves apps from the old iPhone to the new iPhone seamlessly, so you don’t need to download apps one by one from the App Store.
- No data erase on your iPhone – Unlike restoring from iTunes or iCloud backup, the transfer will not overwrite any existing data.
- Freely and selectively transfer data after setup – AnyTrans lets you freely choose what you want to transfer, so you can selectively transfer data to your new iPhone 15 even after setup.
- Move data from Android to iPhone easily – Also, if you are an Android user, AnyTrans is able to switch from Android to the new iPhone.
Now, free Download AnyTrans and install it on your computer first, and then follow the steps below to transfer everything from iPhone to iPhone wholly or selectively according to your demands.
Free Download * 100% Clean & Safe
Step 1. Choose Phone Switcher
Install and launch the software > Choose “Phone Switcher” > Click on “Phone to iPhone” mode.
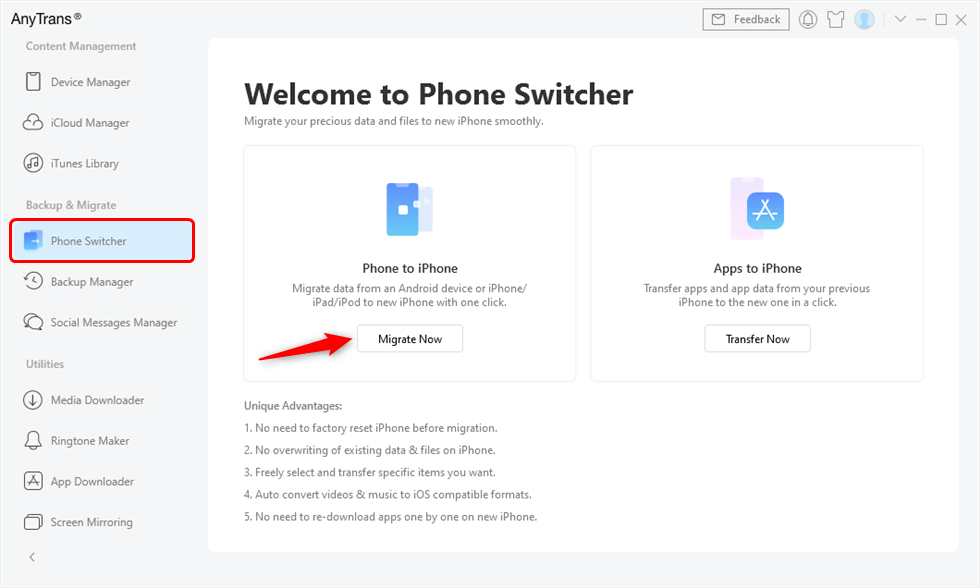
Choose Phone to iPhone to Migrate
Step 2. Connect the Two iPhones
Select the source device and target device > Click the “Next” button to continue.
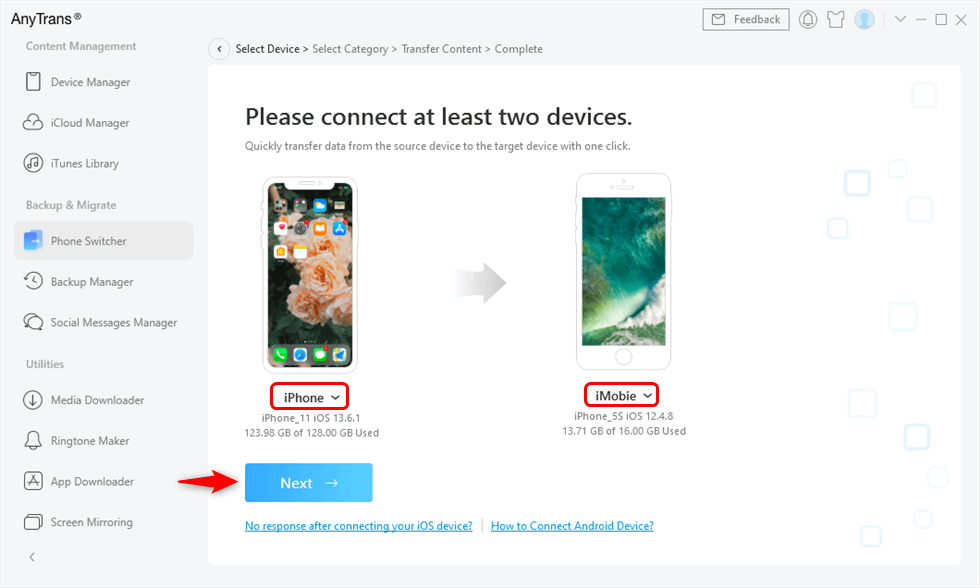
Transfer Data from One iPhone to Another with AnyTrans
Step 3. Transfer Data to New iPhone.
Select the file categories you want to transfer, here we take Contacts as an example (Or you can Select All to move) > Click the “Next” button to start transferring data from old iPhone to new iPhone.
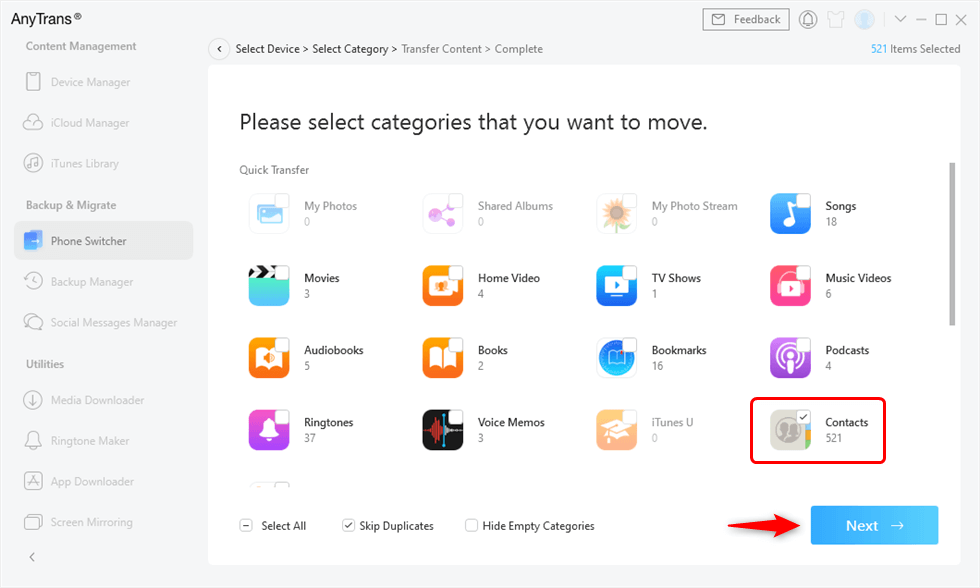
Check the Contacts Box to Transfer
Besides, you can Transfer Data from iPhone to iPhone Selectively by choosing any single data you need, from the Device Manager of homepage.
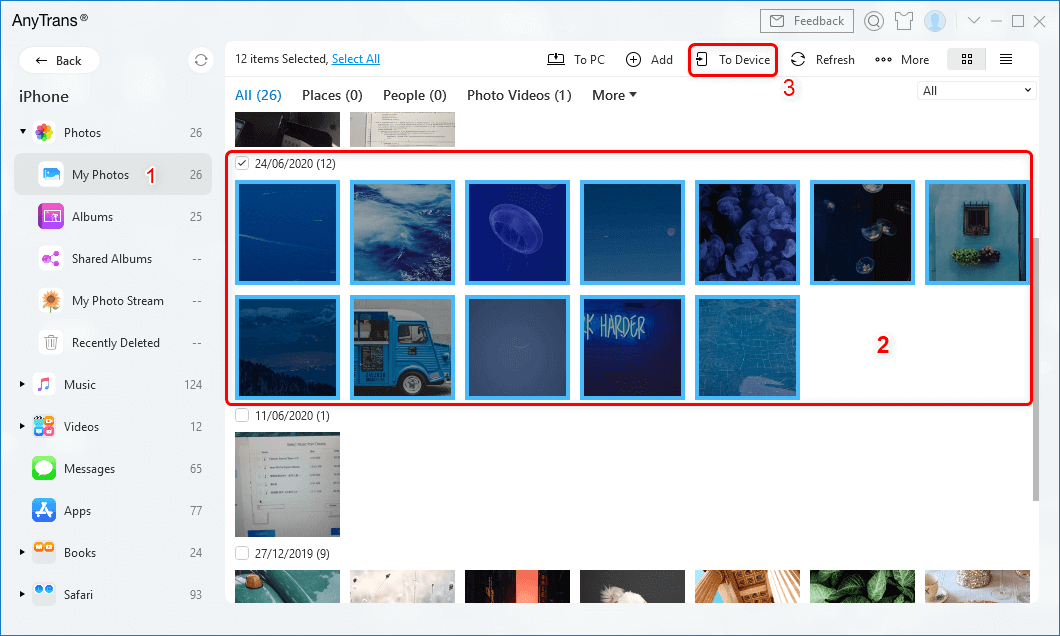
Select Photos and Send to iPhone with Ease
[Video Guide] How to Transfer Data from iPhone to iPhone 2023
# 2. PhoneTrans – A Professional iPhone Switcher
PhoneTrans provides 3 models to complete iPhone switching. In these 3 options, you can use:
- Quick Transfer to transfer data from iPhone to iPhone selectively or whole transfer in 1 click.
- Phone Clone saves lots of time which supports a 1:1 iPhone clone. That’s how you keep all your data on the new iPhone.
- Phone Merge to merge data of two iPhones. No data overwriting. No data loss. No duplicates.
Now, you can follow the tutorial to transfer data from iPhone to iPhone.
Free Download * 100% Clean & Safe
Step 1. Download PhoneTrans and launch it on your computer.
Meanwhile, connect your iPhones to the computer. Then choose Phone to Phone on the left panel and click on Quick Transfer on the right. And then tap the Start Transfer button to go on transferring.
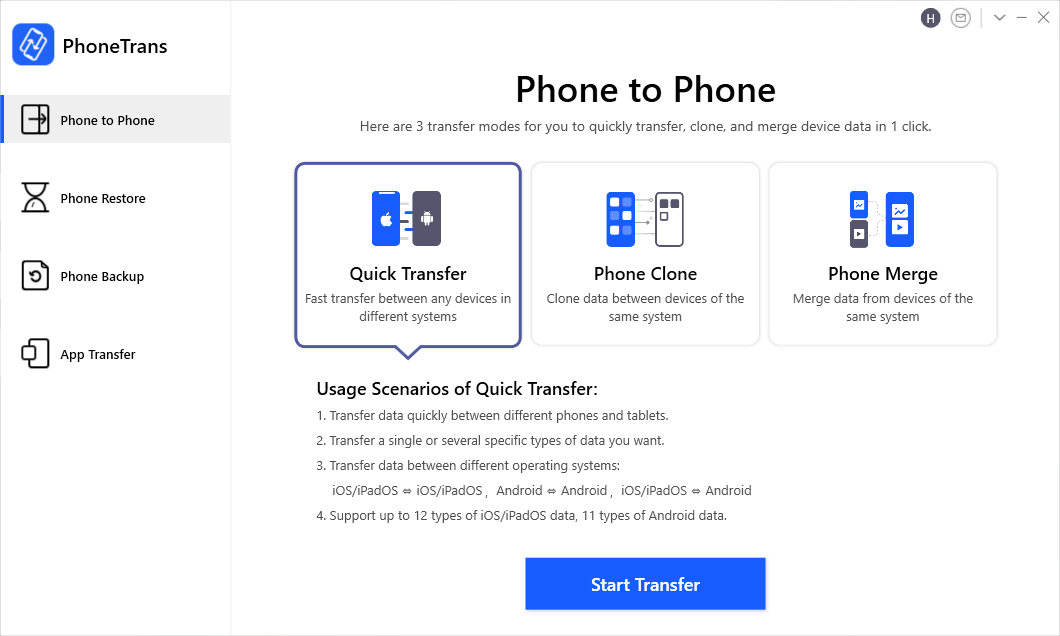
Choose Phone to Phone – Quick Transfer
Step 2. Choose the data you want to transfer from iPhone to iPhone.
Follow the instructions on PhoneTrans. Then you will see all the data you own listed on the screen, you can selectively choose the data you want to transfer from iPhone to iPhone. And also, you can wholly transfer data from one iPhone to the other iPhone. Click on Transfer Now to start data transfer.
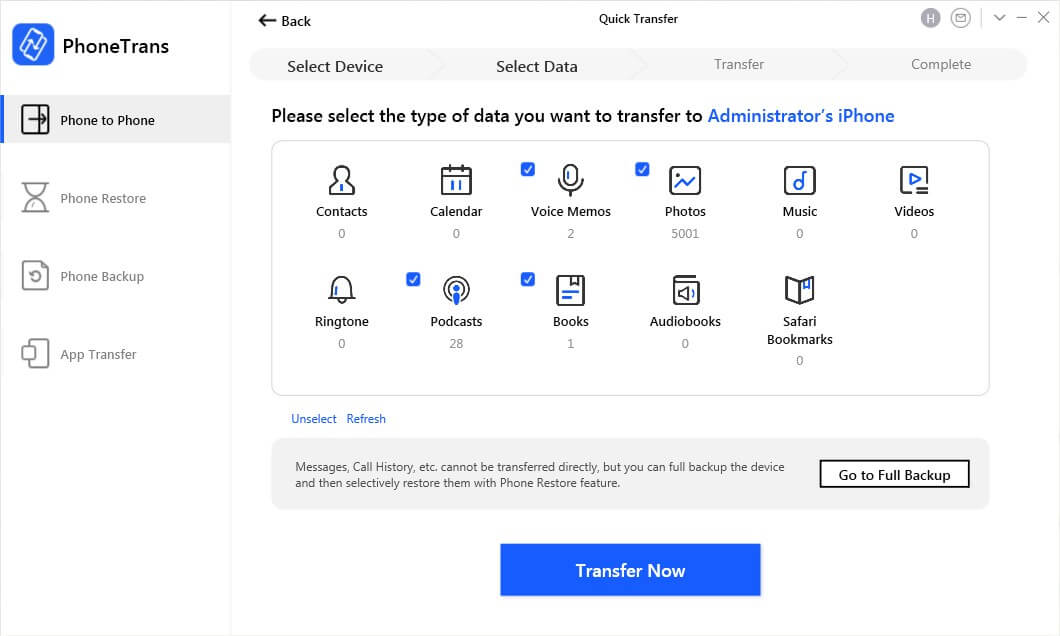
Choose Data to Transfer from iPhone to iPhone
Step 3. Successfully Transferred.
No matter you choose to transfer everything from iPhone to iPhone or selectively transfer data, PhoneTrans won’t take much time. After the transfer is completed, you will see there is a successfully transferred note on the screen.
Besides the Quick Transfer, you can also choose Phone Clone, Phone Merge to transfer data from iPhone to iPhone as you want. Just follow the instruction on the screen, you will figure the steps out easily.
How to Transfer Data from iPhone to iPhone via iPhone Migration
Before the disclosure of iOS 13, Apple has released a new iOS version – iOS 12.4. The most appealing feature of this update is iPhone migration. With this function, you are able to transfer data directly from your previous device to your new one. iPhone migration is a device-to-device transferring option, which provides you with two ways: Transfer from iPhone, and Download from iCloud directly. And with iPhone migration, you can transfer all your data wirelessly or using a wired connection.
Here are the steps of how to transfer data to a new iPhone with iPhone Migration:
Step 1. Start Setting-up Process
Same as the Quick Start, start the setting-up process with the on-screen instruction: Put the new iPhone and old iPhone together. Follow the instructions to use your Apple ID to start the iPhone setup, then tap Continue. When an animation appears on your new iPhone, hold your old iPhone over the new iPhone, then center the animation in the viewfinder. Wait for a message that says Finish on your New iPhone.
Step 2. Enter Passcode on Old iPhone and Set Up Face ID on New iPhone
Enter your old iPhone passcode on your new iPhone. Follow the instructions to set up Face ID or Touch ID on your new iPhone.
Step 3. Choose Transfer Directly from iPhone on Apps & Data Screen
When you get to the Apps & Data screen, click Transfer Directly from iPhone. Keep the two devices near each other and plugged into power until the iPhone data migration process is completed.
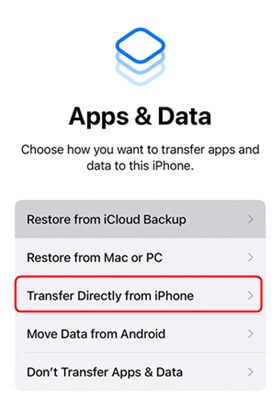
Choose Transfer Directly from iPhone
Further Reading: What to Do When iPhone Migration Not Working >
Transfer Data from iPhone to iPhone After Setup via iCloud
We notice that most of you are visiting this guide on iPhone or iPad, and you may want to find a method to transfer data from iPhone to iPhone without computer. To be honest, you indeed can transfer data from one iPhone to another without a computer, but the only way is by using iCloud backup and iCloud syncing.
However, it has several shortcomings: takes you 30 to 60 minutes to make it; requires your Wi-Fi network enough fast; you may lose important data during transferring; media files (like Films, Apps, Music, Ringtones, iBooks, etc.) can’t be transferred, etc.
1. Transfer Data from iPhone to iPhone with iCloud Backup
Make a backup of your old iPhone if you haven’t made one in advance.
- For iPhones running with iOS 10 and later: go to Settings > Tap on your Apple ID’s profile > Click iCloud > iCloud Backup > Click Back Up Now.
- For iPhones running with iOS 9 or older: go to Settings > iCloud > Backup > Turn on “iCloud Backup” if it is closed > Tap on Back Up Now.
Transfer data from iPhone to iPhone when setup:
Follow the steps to transfer data from iPhone to iPhone when setup: Turn on your new iPhone > Choose your language > Connect to Wi-Fi network > Set up Face ID or Touch ID and create a passcode > When you see the Apps & Data screen, choose to Restore from iCloud Backup option. This will help you transfer data from iPhone to iPhone with iCloud backup.
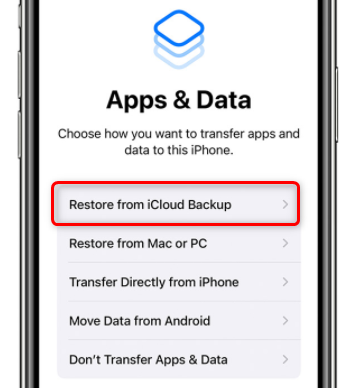
Restore iPhone from iCloud Backup
Transfer data from iPhone to iPhone after setup:
If you have already set up your new iPhone, so you don’t see the restore from the iCloud backup option. So how to transfer data to your new iPhone after set up? you can try:
On your new iPhone, go to Settings > General > Reset > Erase All Content and Settings > Erase iPhone > Set up your iPhone again > Select Restore from iCloud > Select the backup you just created.
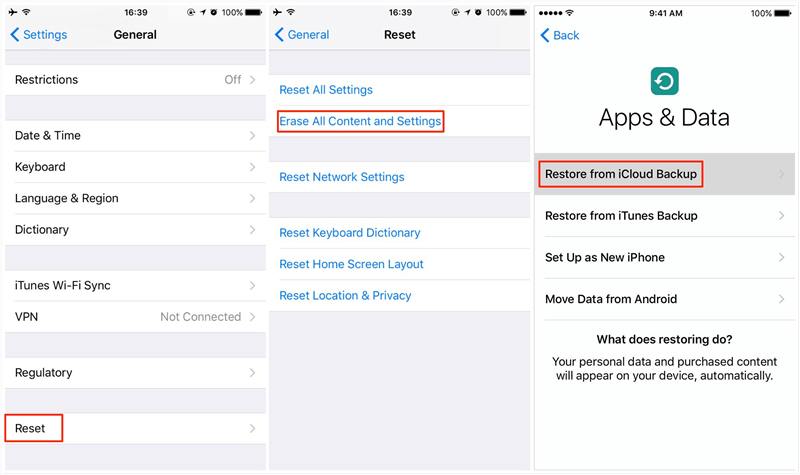
Transfer Data from iPhone to iPhone with iCloud Backup
2. Transfer Data from iPhone to iPhone with iCloud Syncing
Transferring data from one iPhone to another with iCloud syncing only supports several kinds of iOS data, like Photos (only Photo Stream), Email, Contacts, Calendar, Notes, Reminders, etc. Other files like Photos not in Photo Stream, Messages, Music, Ringtones, and Apps, are not on the supported list. Before transferring everything from one iPhone to another with iCloud syncing, there are three things you need to know firstly:
- Both of your iPhones can be connected to a Wi-Fi network.
- You need to log in to the same Apple ID on both of your devices.
- You need to repeat the steps on both of your iPhones.
Step 1. On your iPhone, tap on Settings apps > Click your Apple ID’s profile > Select iCloud.
Step 2. Select the categories you want to transfer like, Photos, Contacts, Calendars, Reminders, Notes, etc., and then tap on it to turn it on one by one.
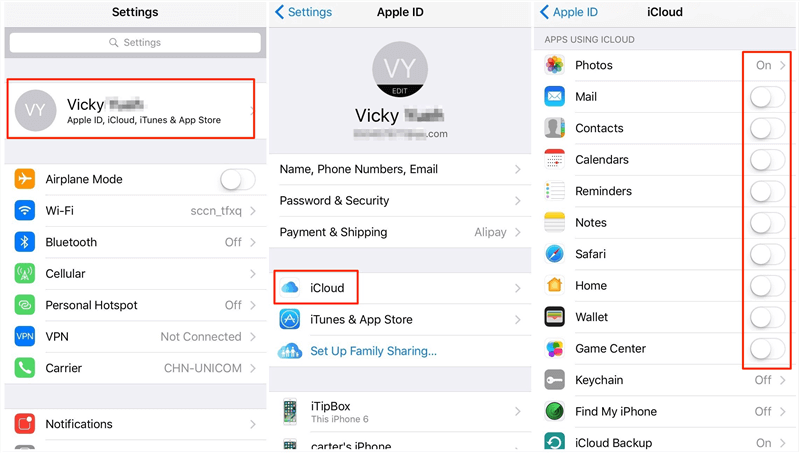
Transfer Data from iPhone to iPhone with iCloud Syncing
Wait for the process to finish. How long this process will last depends on the size of the data you want to transfer to your new iPhone and the speed of your network.
How to Transfer Data from iPhone to iPhone via iTunes
Transferring data from one iPhone to another isn’t a mystery with iTunes. That’s because before iCloud was featured on iOS 5, iTunes was the only way to transfer data from iPhone to iPhone. But now many products and services offer more straightforward and convenient iPhone to iPhone data transfer solutions and turn this iTunes’ tedious job into a simple process. But if you prefer iTunes to transfer from one iPhone to another, you can make it with the following steps:
Step 1. Back up your old iPhone with iTunes first, if you haven’t: Open iTunes > Connect your old iPhone to the computer.
Step 2. Click Device tab > Click Summary > Click This Computer in Backups column > Click Back Up Now.
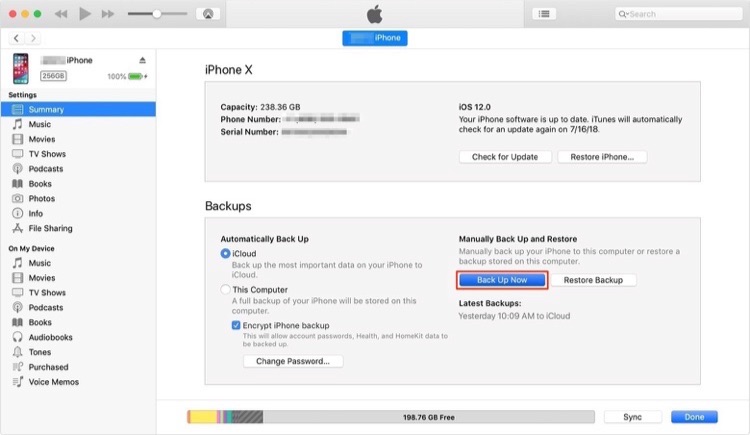
Back Up Old iPhone with iTunes
Step 3. Connect another iPhone to the computer that you have backed up your old device in Step 1.
Step 4. Open iTunes on your computer and select the device tab.
Step 5. Select Restore Backup. Then choose a backup. Please make sure it’s the correct one by looking at the date and size of each if you have more than one iTunes backup.
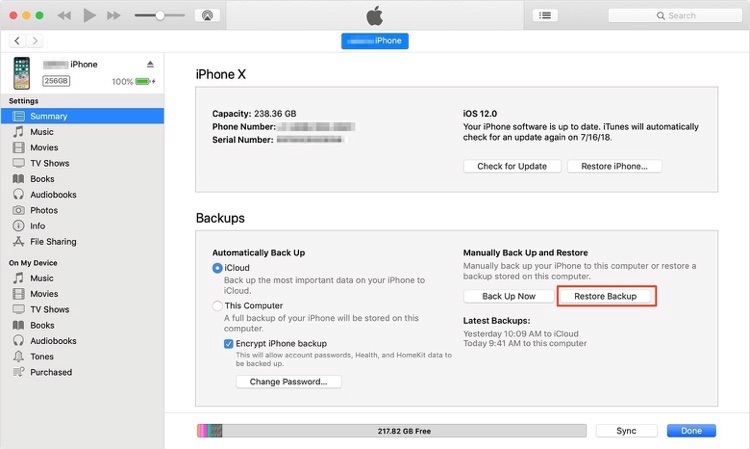
Restore New iPhone from iTunes Backup
Step 6. If the backup file was encrypted, enter your password and unlock it when asked.
Step 7. Wait for the restore process to finish, then complete the rest of the setup steps on your iOS device.
Dozens of minutes probably will be needed. If possible, keep your device connected to an available Wi-Fi and in charge after setup, which allows photos, music, apps, and other contents stored in iCloud to automatically download back to your iPhone.
When transferring data from one iPhone to another with iTunes backup, all the content in the iTunes backup will be restored to the iPhone no matter whether you want to restore all of them or not; and some media files (like Apps, music, ringtones, movies, iBooks, etc.) won’t be transferred during this process.
Best iPhone to iPhone Transfer Solution – Comparison Chart
| AnyTrans | PhoneTrans | iTunes | iCloud Sync | iCloud Backup | |
| Transfer Media Files | |||||
| 1-Click Transfer | |||||
| Selectively Transfer | |||||
| No Data Loss | |||||
| Transfer Speed | Fast | Fast | Fast | Slow | Slow |
| No Internet Needed | |||||
| No Apple ID limit | |||||
| Availability | Free Trial | Free Trial |
The Bottom Line
With the help of the full guide on how to transfer data from iPhone to iPhone, you must have transferred everything you want on your iPhone, iPad, or iPod touch. If this post works for you, please share it with the people around you. If you have any questions, feel free to message us by clicking the Chat Window in the bottom right corner. Download AnyTrans to Explore More Now >
Transfer iPhone to iPhone after Setup
- No need to use iTunes or iCloud, saving you from many troubles.
- One-click to transfer all data from an old iPhone to a new iPhone.
- Superfast transferring speed, greatly saves your time.
- Unlike iTunes or iCloud, no data loss risk.
Free Download100% Clean & Safe
Free Download100% Clean & Safe
More Related Articles
Product-related questions? Contact Our Support Team to Get Quick Solution >

