How to Transfer Ringtones from iPhone to iPhone [iPhone 15 Included]
Just updated to the newest iPhone 15 and want to send some ringtones from your old iPhone to the new iPhone? Read this guide to see how to transfer ringtones from iPhone to iPhone with or without iTunes.
iPhone to iPhone Transfer Tips
Transfer/Sync iPhone
Transfer Media Data
AnyTrans – Transfer Ringtone from iPhone to iPhone
AnyTrans can easily transfer ringtones from old iPhone to new iPhone in clicks. Contacts, photos, music, etc. are supported as well. Also, you can send apps or restore iCloud/iTunes/Google account backup to the new iPhone with AnyTrans. Free get AnyTrans to have a try>>
If you changed to a new iPhone 15 and want to know how to share ringtones on iPhone, here you are in the right place. In the past, iTunes might be the first choice when it comes to syncing iPhone data. However, since iTunes 12.7, Apple has removed the ability to manage ringtones. You can’t use iTunes 12.7 to sync ringtones anymore. Then how to transfer ringtones from iPhone to iPhone?
Worry not. In this post, we will show you simple ways to send ringtone to iPhone. And even the newest iPhone 15 & iOS 17 are supported. And we will also tell you the iTunes way if you are still using the older iTunes version. Let’s see the methods to transfer ringtones to iPhone.
In addition, here are some other tips about iPhone ringtones, click and read if you need:
- How to Add Ringtone to iPhone without Computer >
- How to Set MP3 as Ringtone on iPhone with/without iTunes >
- How to Record and Set Your Own Ringtone on iPhone >
Transfer Ringtones from iPhone to iPhone without iTunes 1-Click [Easy & Fast]
How do I transfer ringtones from iPhone to iPhone without iTunes? If you want to transfer your ringtones to another iPhone selectively or wholly, then AnyTrans – iPhone Data Manager will be a perfect choice.
As one of the most powerful iOS data managers, AnyTrans allows you to preview all your ringtones (purchased & non-purchased), as well as other data, like photos, videos, etc., and then send them to another iPhone. What’s more, AnyTrans works well even on the latest iPhone 15 and iOS 17, so you can feel free to transfer data from your old iPhone to your iPhone 15, iPhone 15 Max, iPhone 15 Pro, and iPhone 15 Pro Max. Check its features below to transfer ringtones from one iPhone to another:
AnyTrans – Transfer Ringtones to iPhone
- Preview and send ringtones from iPhone to iPhone. No data erased.
- All formats like mp3, m4a, m4r, WMA, Wav, etc. are supported.
- Add ringtones from computer to iPhone, and vice versa.
- Besides, make custom ringtones and then send them to your iPhone.
Free Download100% Clean & Safe
Free Download100% Clean & Safe
Free Download * 100% Clean & Safe
Now, download AnyTrans on your computer first, and then follow us to see how to transfer ringtones from iPhone to iPhone by using this tool.
How to Transfer Ringtones from Old iPhone to New iPhone
Step 1. Free get and open AnyTrans > Connect your two iPhones to the computer via USB cables > Click on “Device Manager” > Select one iPhone as the source iPhone from the top of phone image> Then click on “More” option.
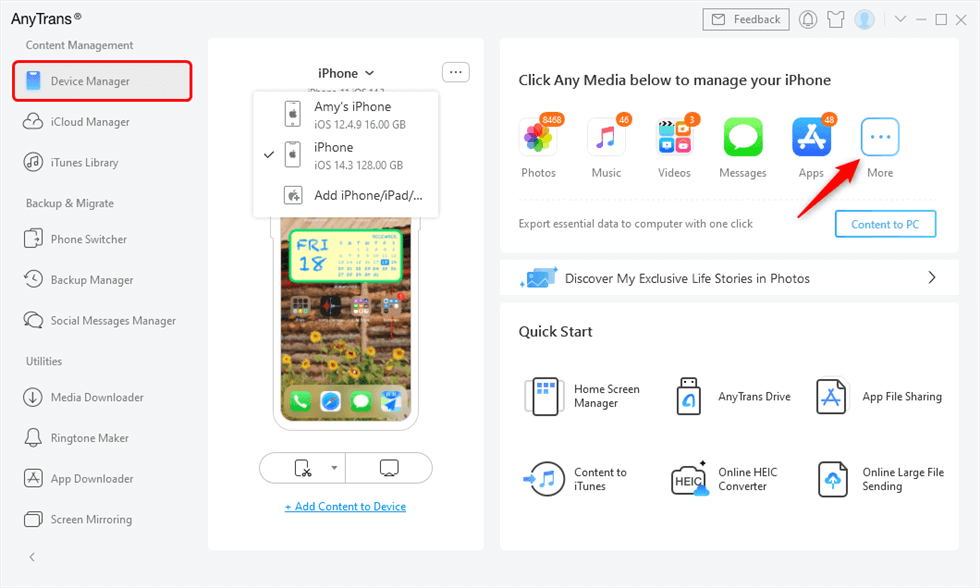
Connect two iPhones
Step 2. Tap on Ringtones > Select the ringtones you want to transfer > Click the “To Device” button to transfer them to your new iPhone. Besides, you can click “Add” button to put ringtones from computer to iPhone or “To PC” button – to share ringtones on iPhone to computer.
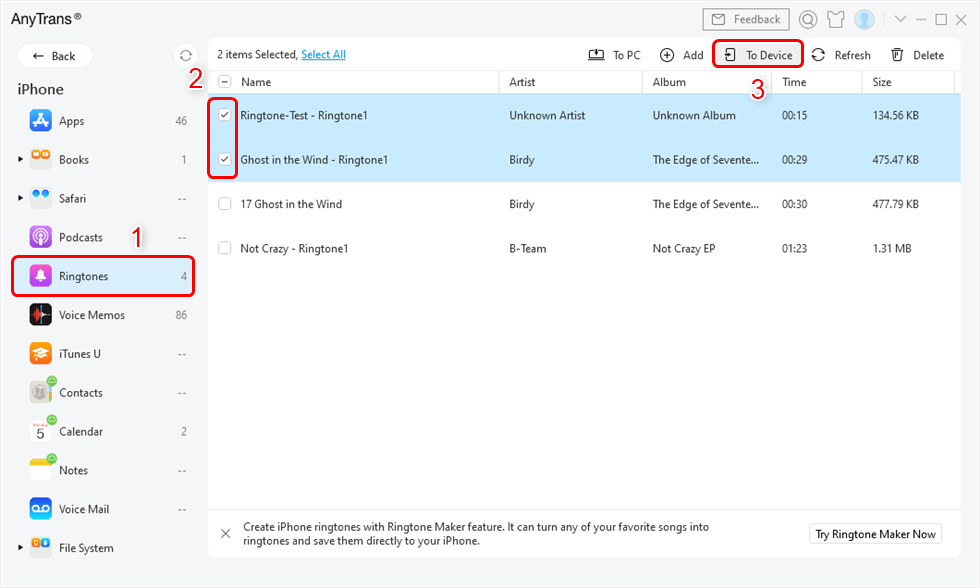
Select Ringtones and Click To Device Button
Tips: Add Music from iTunes Library to iPhone
AnyTrans enables you to enter iTunes Library, so you can sync music playlists, movies, and podcasts from iTunes Library to iPhone.
- Free get and open AnyTrans and click iTunes Library, here are the options for you to add media files from computer, transfer music from iTunes Library to your device.
- Click To Device button and the selected media files will be synced to the iPhone immediately.
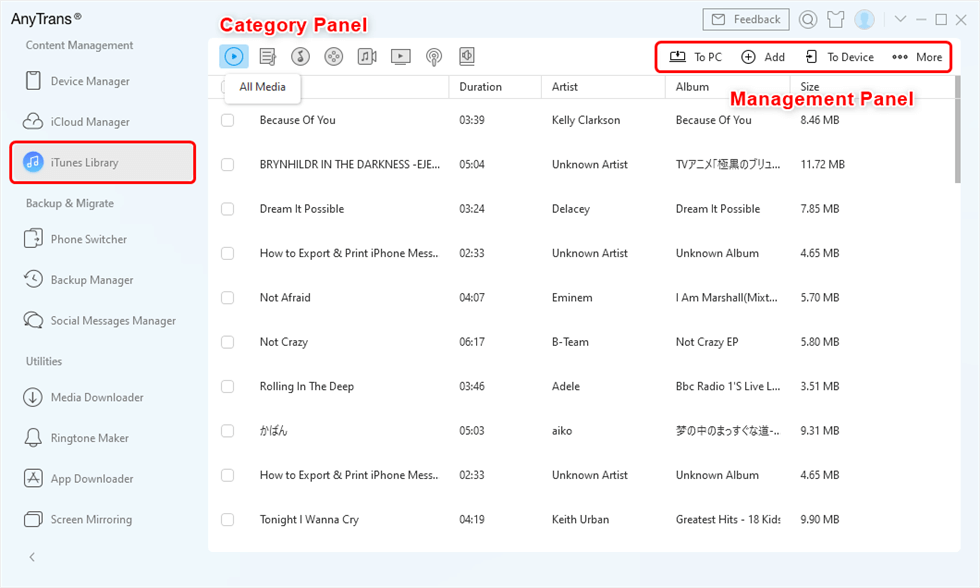
Manage iTunes Library with AnyTrans
How to Transfer Ringtones from iPhone to iPhone via AirDrop?
When it comes to iPhone data transfer, in addition to iTunes, many people will think of AirDrop. So, can you AirDrop ringtones to iPhone? The answer is Yes. AirDrop can help you transfer a lot of important data you need between iPhones, so you can definitely try to use AirDrop to solve how to share ringtones on iPhone. Below is the specific guide on how to transfer ringtones from iPhone to iPhone.
- Open Control Center on both iPhones > Make sure Wi-Fi, Bluetooth, and AirDrop are enabled. If not, open them > Select Contacts Only or Everyone as required.
- Find the ringtone you want to transfer on your iPhone and tap the Share button > Tap AirDrop and select your new iPhone.
- Click Accept on your new device to get the ringtone.
How to Transfer Ringtones from iPhone to iPhone with iTunes?
While if you are still using the older iTunes versions (iTunes 12.6 and earlier), you can still apply iTunes to share ringtone iPhone. And for the new iTunes versions on 12.7 and later, you can still sync music, movies, TV shows, and audiobooks.
But before taking this method, you need to notice that the whole process is about transferring the ringtones on one iPhone to iTunes library, and then syncing to another iPhone from iTunes library. There are two major things you need to do to solve how to share a ringtone on iPhone via iTunes.
Transfer ringtones from old iPhone to iTunes library firstly:
- Open iTunes, and go to Edit.
- Click on Preference, and then choose Devices.
- Check Prevent iPods, iPhones, and iPads from syncing automatically.
- Connect your old iPhone to the computer via USB cable.
- Launch iTunes if it is not running automatically.
- Click File, and then choose “Devices”.
- Click on the “Transfer Purchases from iPhone”.
- Click Apply at the right bottom.
- iTunes will automatically sync the purchased ringtones to the iTunes library.
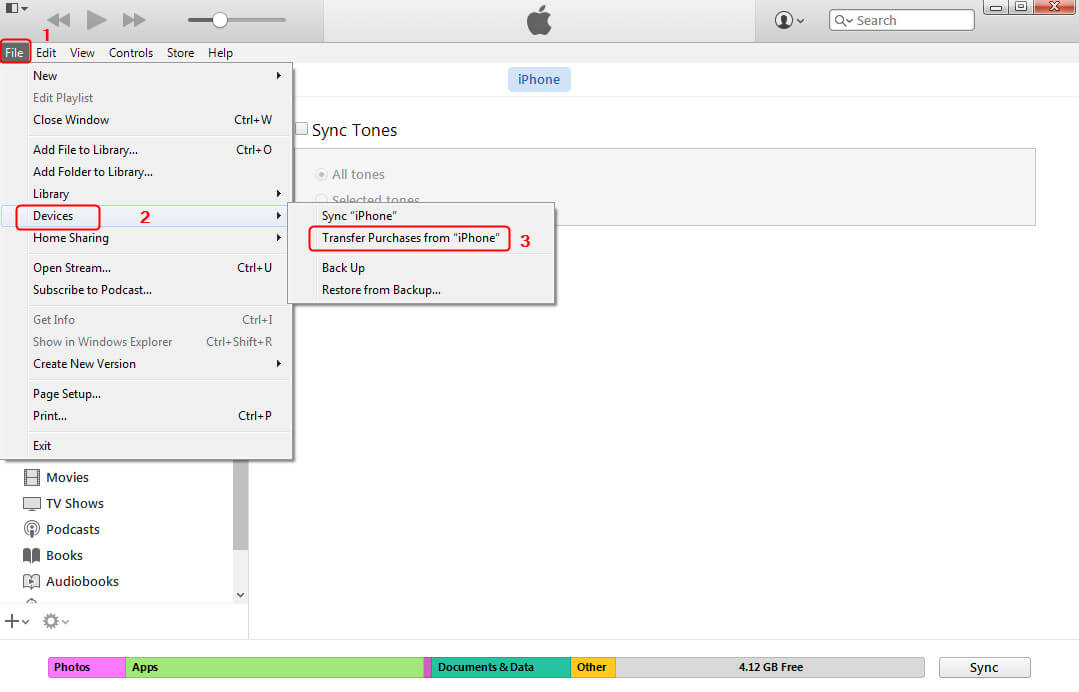
Transfer Ringtones from Old iPhone to iTunes Library
Sync ringtones from iTunes to new iPhone:
- Disconnect the iPhone from the computer.
- Connect another iPhone to iTunes.
- Click on your iPhone, and choose the Tones.
- Check the box for Sync Tones.
- Check the ringtones you want to sync.
- At last, click the Sync button in the bottom right corner of iTunes.
- After it completes, the synced ringtones should be on your new iPhone.
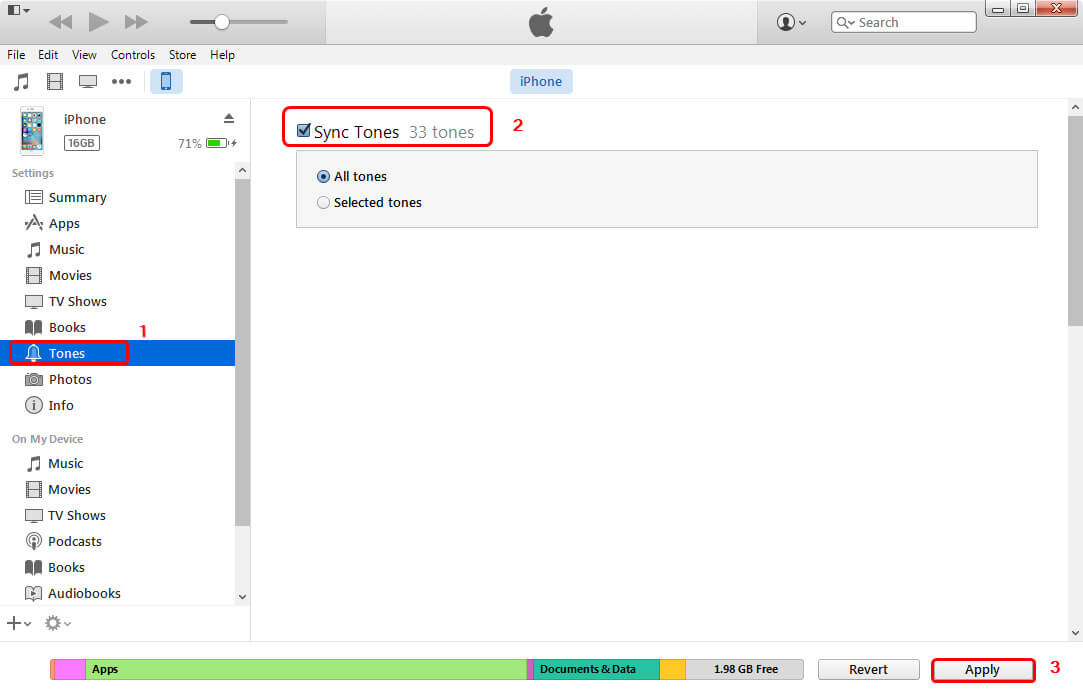
Sync Ringtones from iTunes to New iPhone
- iTunes only supports purchased items transferring to the iTunes library, which means that only purchased ringtones on your iPhone can be transferred to another, not including those items from other sources.
- iTunes syncing will erase the existed media files, such as songs, videos, ringtones, and more, on iPhone. If your iPhone is not totally new, but with many important data, you had better not taking iTunes to transfer ringtones from iPhone to iPhone.
How to Transfer Ringtones from iPhone to iPhone via Email
Another method for sending ringtones to iPhones is via email. If the ringtones are less than 50MB in size, they can be readily sent over email. Ringtones delivered by email, on the other hand, cannot be used right away; they must first be played in GarageBand before being installed. The step guide is as follows:
- Select the ringtone to send and tap on the Share icon. Then, select the Mail app.
- Enter the email address associated with the account on your other iPhone and press the Send button.
- Open the mail app on your other iPhone and save the ringtone from the email you just got.
Bonus Tip. How to Make Custom Ringtone on iPhone
AnyTrans makes it ultra-easy to create your custom ringtones and text tones. You can make your own ringtone with any audio file, no matter MP3, M4A, or other formats. With AnyTrans, you can even make adjustments accordingly to get the perfect tone that you prefer. And here are the steps to make custom ringtones with AnyTrans:
Step 1. Download AnyTrans on your computer > Connect your iPhone to the computer with a USB cable.
Free Download * 100% Clean & Safe
Step 2. Open AnyTrans > Choose “Ringtone Maker” mode > You are able to select music from the computer, iOS device and iTunes Library here (just take Device option as an example) > Click “Import from Device” option and select the music you need.
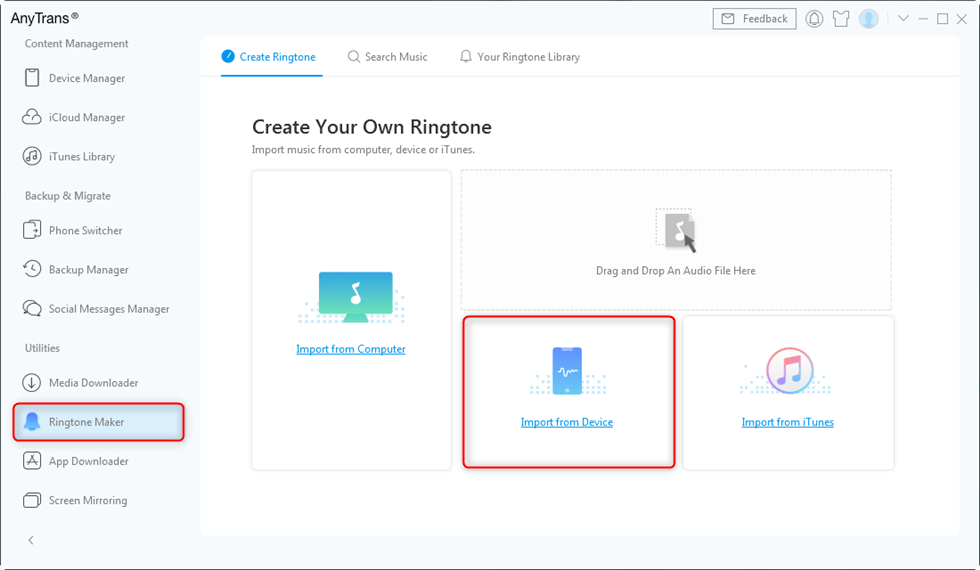
Tab Import from Device
Step 3. The song will be set as a ringtone by default. You can drag the slider to choose your favorite period. After completing the customizing process, click the “Audition” button to listen to the ringtone. If you like it, click the “Import to Device” button and it will be added to the ringtones list on your iPhone.
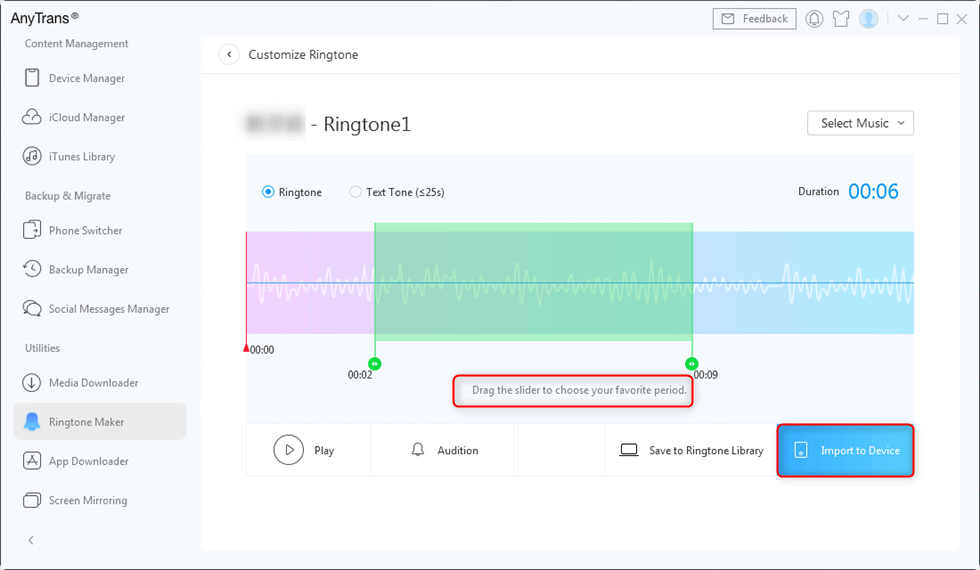
Set the Duration of the Custom Ringtone and Import to iPhone
Frequently Asked Questions
We have collected the frequently asked questions about iPhone ringtones and have answered them one by one.
Q&A 1. Where are the Ringtones Stored on my iPhone?
You can go to Settings > Click Sounds & Haptics > Choose Ringtone, here you can view the default ringtones on iPhone. Also, the transferred and customed ringtones will be saved here. You can choose one and set it as your ringtone.
Q&A 2. How to send a ringtone to another iPhone via text?
Though many people ask this question, we are sorry to tell you that you cannot use text to send ringtone to iPhone. But you can feel free to try the methods above to transfer ringtones to iPhone.
The Bottom Line
That’s all for how to transfer ringtones from iPhone to iPhone. iTunes supports you to sync tones with two steps, but only for iTunes 12.6 and earlier. Besides, with AnyTrans, you can manage ringtones easily, transferring from iPhone to iPhone, or from a computer or iTunes library to iPhone. Free download AnyTrans to transfer ringtones or make custom ringtones for your iPhone. Any questions on this guide will be warmly welcomed.
Free Download * 100% Clean & Safe
More Related Articles
Product-related questions? Contact Our Support Team to Get Quick Solution >


