How to Transfer Photos from iPhone to iPhone
Got a new iPhone 15 or 14 series? Want to transfer your precious photos from the old iPhone to the new iPhone 15 series? Read this guide to learn 9 efficient ways to transfer pictures from iPhone to iPhone effortlessly on your own. These methods apply for all iPhone models: iPhone 15/14/13/12/11/XS/XR/X/8/7/6/5/4.
iPhone to iPhone Transfer Tips
Transfer/Sync iPhone
Transfer Media Data
AnyTrans – Transfer Photos from iPhone to iPhone 1-Click
How to transfer photos from iPhone to iPhone in an easy and safe way? Free download AnyTrans to 1-click to transfer all photos (Camera Roll, Photo Library, Photo Stream, and Albums) from one iPhone to another iPhone quickly and easily.
According to our survey, users usually transfer photos from iPhone to iPhone in the following cases:
- Get a new iPhone series, and want to transfer photos from the old iPhone to the new iPhone.
- Have some interesting photos, and want to share photos between iPhone and your families’ or friends’ iPhones.
- Seek to transfer photos from one iPhone to another for a regular backup.
No matter which situation you are in, you are totally on the right page. Transferring pictures from one iPhone to another is quite easy as long as you get the right toolkit. In this post, we will show you how to transfer photos from iPhone to iPhone/iPad/iPod touch in 9 different ways: shared album, cloud storage service, iTunes, iCloud, AirDrop, and professional iPhone photo transfer tools.
1. How to Transfer Photos from iPhone to iPhone 15 1-Click [Easy & Safe]
Although we will also mention the option of using iTunes/iCloud to transfer photos later on, both methods will either erase the existing data of the device or only transfer a small number of photos manually. Therefore what is the fastest way to transfer photos from iPhone to iPhone? Here, we’ll recommend a powerful app to transfer photos from iPhone to iPhone. They are proved to be quite effective and can work out really well. Sure, with a tool, time will be saved and no skills are required.
According to our test, the iOS photos transfer tool – AnyTrans can be the quickest and easiest way to do the task, even when you seek to transfer a large number of photos between iPhones. No more annoying photo transfer from iPhone to iPhone limitations. Just open AnyTrans on your computer and follow its instructions, the photo transfer would complete in minutes.
AnyTrans – iPhone Photos Transfer
- Just a few minutes and 1 click to move all photos.
- The ONLY way to transfer photos in all albums.
- Copy everything to the new iPhone in 1 click as you prefer.
- No risk of data losing or leaking.
Free Download100% Clean & Safe
Free Download100% Clean & Safe
Free Download * 100% Clean & Safe
Now, Free Download AnyTrans, then follow the steps below to learn how to transfer photos from iPhone to iPhone effortlessly.
Step 1. Free install AnyTrans on your Mac or PC > Run it > Connect both of your iPhones to the computer (PC or Mac) with USB cables > Click on the “Photos” category.
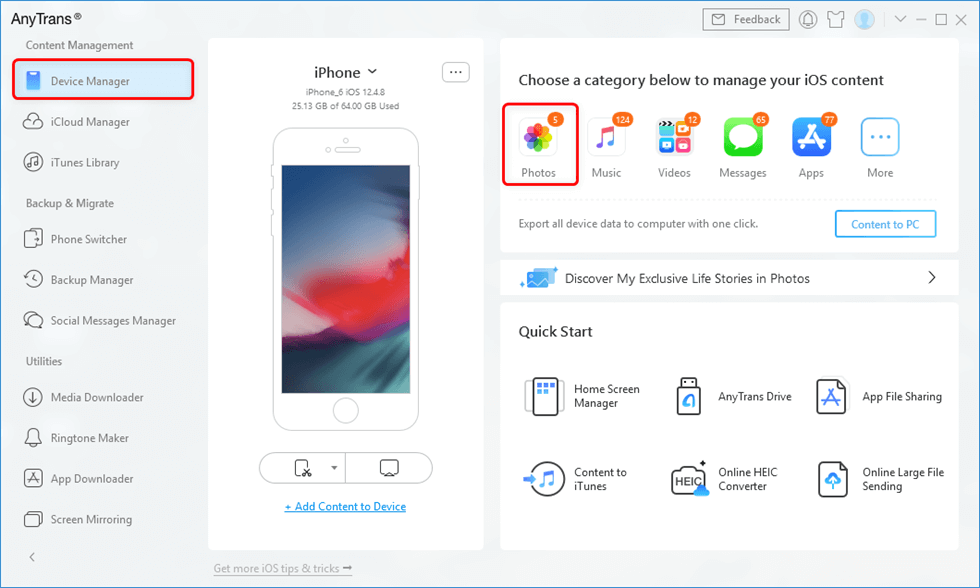
Go to Device Manager and Click Photos
Step 2. Pick up the album with the photos you want to transfer > Select the specific photos you want to transfer > Click on the “To iPhone” button to transfer photos to new iPhone.
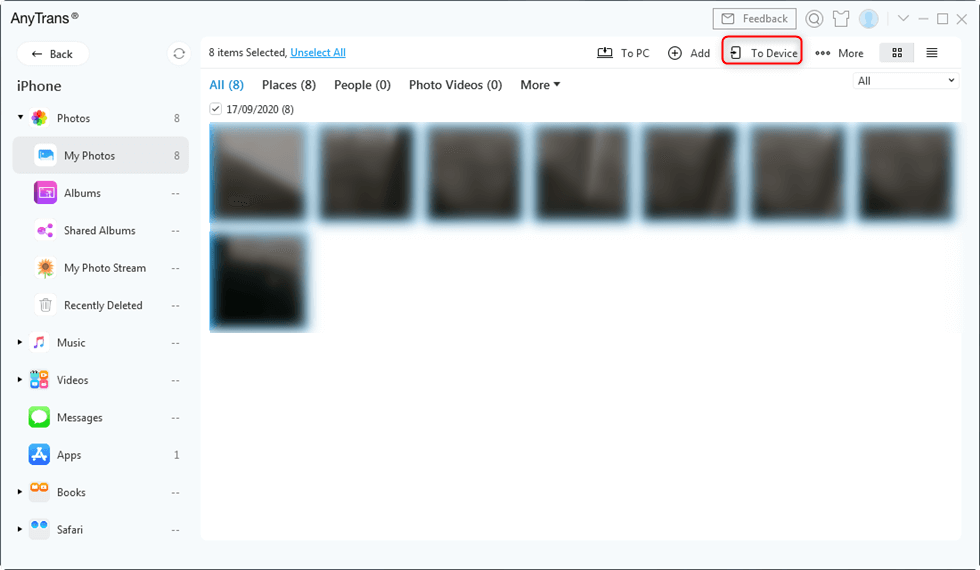
Select the photos you want to transfer
Free Download * 100% Clean & Safe
We have prepared a video tutorial here to show you how to transfer photos from iPhone to new iPhone (mainstream iPhone 15 series supported). After watching this video, you might have a better idea of how AnyTrans works.
2. Transfer Photos from iPhone to iPhone with iCloud
iCloud Photos allows you to sync photos across all iOS devices. It replaced the traditional Camera Roll and Photo Stream options with an All Photos section. There is no 30 days or 1,000 photos restriction either. There are some tips to know before starting the tutorial about how to transfer photos from iPhone to iPhone via iCloud:
- The two iPhones need to be iOS 8.3 or later.
- You need to enable iCloud Photo Library on both iPhones.
- The two iPhones should log into the same Apple ID.
- You will need to be connected to a wireless network to upload the photos.
- You need to make sure there is enough iCloud storage space since iCloud Photo Library uses your iCloud storage allotment.
Step 1. Sync photos from iPhone to iPhone using iCloud
-
- Head to Settings on your iPhone > [your name] > Tap on iCloud.
- Click on Photos which is Off now.
- Enable the iCloud Photos.
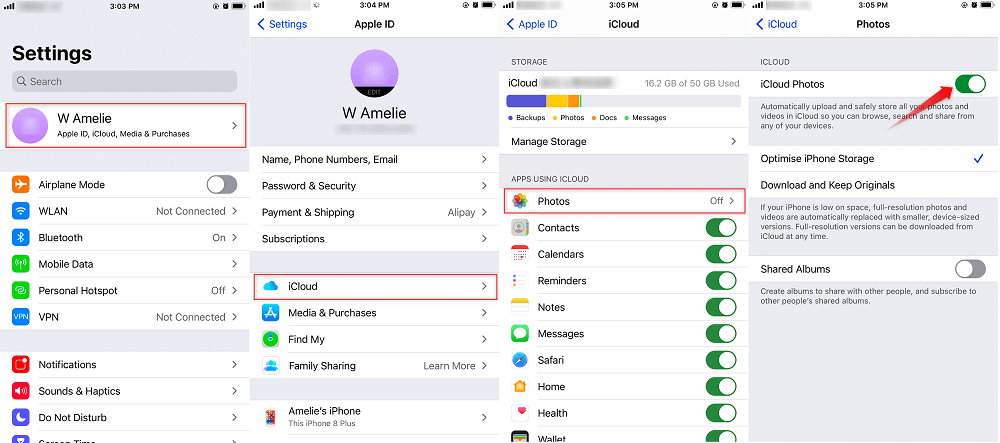
Transfer Photos from iPhone to iPhone Using iCloud
Once you completed all these steps, the iCloud Photos are enabled and the button already turned green.
Step 2. Transfer Photos from iCloud to the new iPhone
-
- Open the new iPhone > tap Restore from iCloud Backup on the Apps & Data page.
- Log into the same iCloud ID(Apple ID) you have used to sync the photos > Choose a backup to restore.
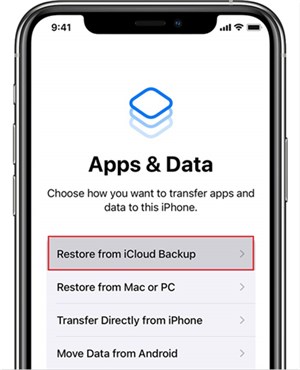
Choose Restore from iCloud Backup
3. Send Photos from iPhone to iPhone with iCloud Link
iOS 14 brings some more new features, you can share your files with the new function – Copy iCloud Link. It supports transferring photos from iPhone to iPhone with just a link. It’s quite easy which only requires your iPhone are updated to iOS 17. Keep on reading and knock out how to transfer photos with it.
- Open your iPhone and go to Photos > Choose the photos you want to transfer > Click on the Share button > Scroll down to the Copy iCloud Link > Give it seconds to prepare the Link.
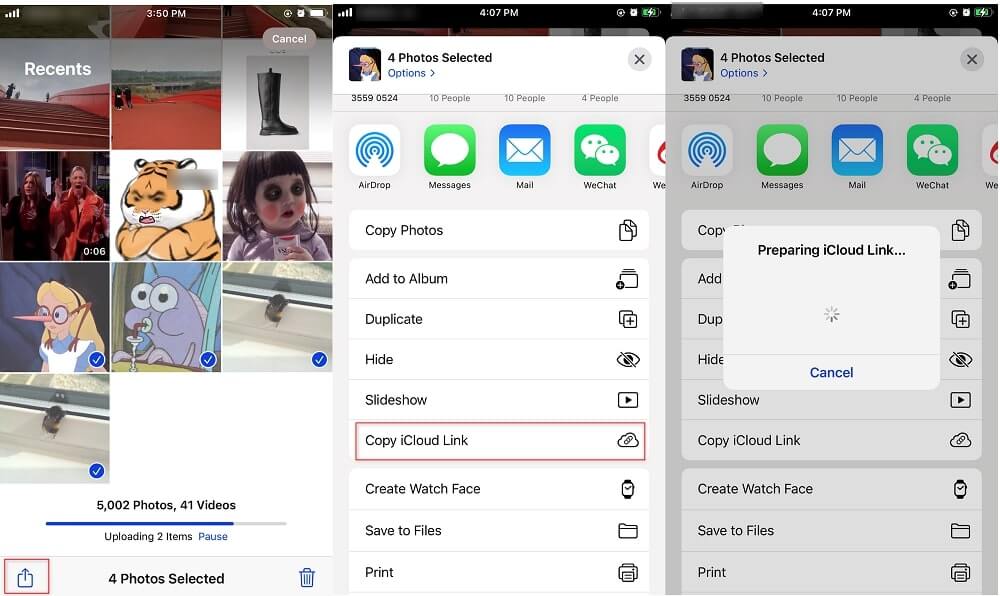
Copy iCloud Link to Transfer Photos from iPhone to iPhone
- Once it completed the link copy, you can go to the messages, email, WhatsApp, etc. to paste the link and send the link to the iPhone you want to share the photos with. Click on the ADD ALL or Choose the Select to save the pics to your Library.
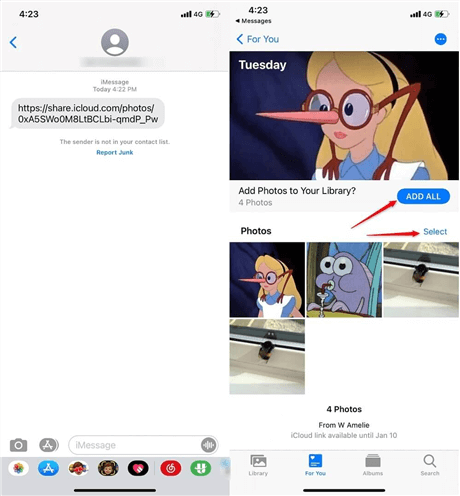
Add Photos from iCloud Link
- Our users sent us letters saying that they want some other info about how to transfer files to the new iPhone, and how to import photos to their Mac. So, here we would like to add a part to talk about these two topics.
- For those users who want to import photos from iPhone to the Mac or PC, you have many options to do the task, like iCloud Photos, the Photos app on your computer, Email, etc. And the guide How to Import Photos Videos from iPhone to Computer with 7 Ways collected all the possible ways to help you send your iPhone photos to your computer.
- For the users who want to get the ideas to transfer data from iPhone to iPhone, you can refer to this guide to get more details: How to Transfer Data from iPhone to New iPhone >
4. How to Transfer Photos from iPhone to iPhone with iTunes/Finder
Except for iCloud service, iTunes can be one of the most common ways for iOS users to transfer photos from iPhone to iPhone for free. But iTunes will erase the existing photos in Photo Library when you try to transfer pics to your new iPhone. Also, if you have turned on iCloud Photo Library on your iPhone when syncing photos from iDevice to iDevice with iTunes, you may get a pop up: “iCloud Photos is On. XXX can access photos in iCloud. Photos can be downloaded to your device via Wi-Fi or cellular network”.
In this case, you have to turn off the iCloud Photo Library on your iPhone, or you can’t finish the sync process via iTunes. But if you turn off the iCloud Photo Library on your device, all the photos stored in iCloud but not on your device will be erased.
Here’s how to transfer photos from iPhone to iPhone using iTunes:
- Connect your iPhone to the computer with a USB cable.
- For Mac users, launch the “Photos” app if it doesn’t open automatically.
- For Windows users, click Import Pictures and Videos when AutoPlay appears.
- Pick up the photos you want to transfer.
- Click “Import or Import Selected” to import photos from your iPhone to your PC or Mac computer.
- Connect your new iPhone, family, or friends’ iPhone to the computer with a USB cable.
- Launch “iTunes” on your computer.
- Click the “Device” button in the upper-right corner of iTunes.
- Click on the “Photos” option on the left panel.
- Select “Sync Photos” from Application or Folder.
- Click the “Apply” button to sync photos to your new iPhone.
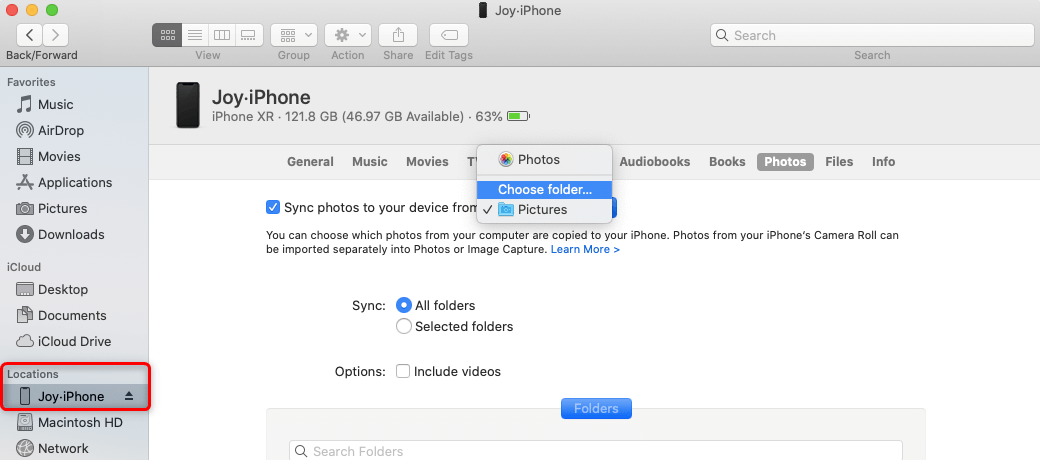
Sync Photos from Mac to iPhone via Finder
5. Copy Photos from iPhone to iPhone using AirDrop
If you seek to transfer photos from iPhone to iPhone wirelessly, you can make use of AirDrop. AirDrop requires iOS 7 on iPhone 5 and later, and if you have a few photos to transfer, it’s a good choice. But if you have hundreds or thousands of photos need to transfer, this method is not recommended. Now, let’s check how to transfer pictures from one iPhone to another using AirDrop:
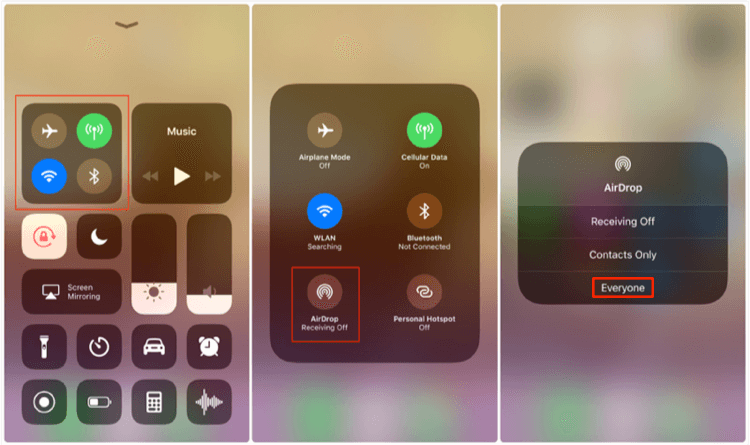
How to Transfer Photos from iPhone to iPhone with AirDrop
Step 1. Enable AirDrop on two iPhones
- Launch Control Center by swiping up from the bottom bezel of your iPhone.
- Press and hold your finger on the upper-left box with the airplane buttons.
- Tap AirDrop > Choose Contacts Only or Everyone to turn AirDrop on.
Step 2. Select photos you want to transfer from the Photos app
- Open the Photos app on your iPhone and find the pictures you want to send.
- Tap the Share icon in the lower-left corner.
- The AirDrop option will show and tap on it.
Step 3. Receive photos from the target iPhone
- AirDrop will pop up and ask if you want to receive photos just send from the iPhone.
- Receive the photos and they will be saved to the Photos app.
6. How to Move Photos from iPhone to iPhone with Email
When there were no other transfer options available, people used to use the email feature to send and receive content including photos. In this method, what you do is that you email yourself all the photos you want to share and then you access your email account on the device where you want your photos. Since all it requires is sending an email, you should be done in no time.
Here’s how to send photos to a new iPhone using Email:
- Compose a new email in your favorite email client on your iPhone.
- When the compose screen opens, tap on the option to add a new attachment.
- Add all the photos that you want to transfer to your new iPhone.
- Send the email once all the photos have been attached.
- On your target iPhone, open the same email inbox and download the attachments.
- Your photos are now available for viewing on your target iPhone.
- Your task is done.
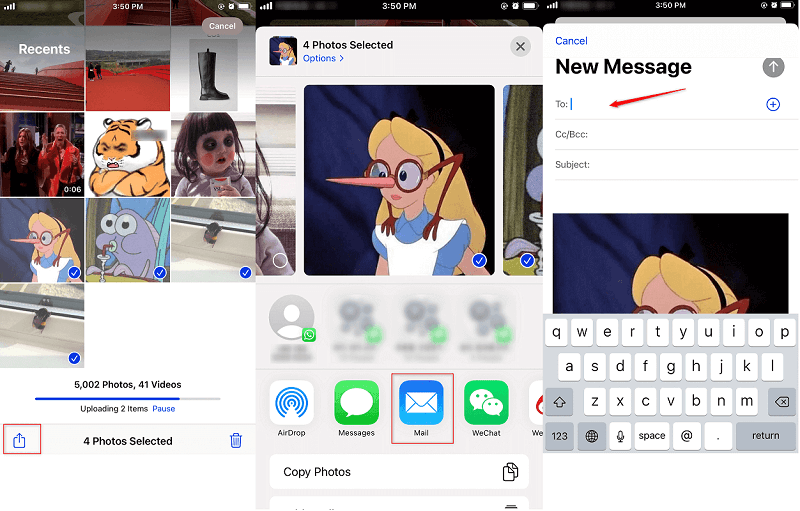
How to Transfer Photos from iPhone to iPhone with Email
7. Transfer Photos from iPhone to iPhone by Creating a Shared Album
This method works if you regularly share photos with the same person. That is you can create a shared photo album. This way, when you add any photo to it, the other person can see it immediately. Here’s how to create a shared album.
- Open the Photos app and tap “Albums” at the bottom of the screen.
- Tap the blue “+” at the top left of the screen to create a new album.
- Tap “New Shared Album.”
- Name the album, then tap next.
- Enter all of the contacts with whom you want the album to be shared, then tap “Create.”
8. Transfer Photos between iPhones via Cloud Storage Services
Similar to iCloud, cloud storage services like Dropbox will also help you sync photos from an iOS device to another.
- Download and install the app on both of the iPhones.
- Sign in to the app with the same account.
- Upload photos to Dropbox from the iPhone you want to copy photos from and then the images will be synced to another device under a Wi-Fi connection.
The Bottom Line
Apparently, compared with the iCloud and iTunes way, AnyTrans offers you a much easier way to transfer photos from iPhone to iPhone. Except for photo transfer, they also support transferring more than 20 files from iPhone to iPhone, including contacts, messages, voice memos, notes, music, etc. Why not give AnyTrans a try now?
If you have more tips on how to transfer photos or if you encounter any problems using the above methods, please feel free to leave a comment or share in the comments section!
Free Download * 100% Clean & Safe
More Related Articles
Product-related questions? Contact Our Support Team to Get Quick Solution >


