How to Resize An Image on Mac
Resizing an image on your Mac is not as difficult as you might think. Read this post and find out how to resize an image on Mac easily.
Resizing your image is one of the best ways to ensure it’s optimized for your website, social media posts, etc. However, the procedure to execute this operation would vary depending on the kind of device you use.
So, if you’re using a Mac computer and wondering how to resize images on Mac, this article will introduce you to the proven ways to resize an image on Mac without losing quality.
Table of ContentsHide
What Is Resizing An Image?
Image resizing is an image editing technique that is used to adjust the dimension of an image to make it look larger or smaller without cutting out any part. One of the reasons many folks resize their image is to reduce the file size so it can be easily shared on other platforms.
How To Resize An Image on Mac with Preview
One of the ways you can resize an image on Mac is by using the Preview feature. Preview is a built-in image and PDF viewer on Mac that offers a wide range of functionalities, including image editing tools that you can use to perform simple tasks like image resizing. Here is how it works;
- Locate the “Image” you want to resize and double-click it to open it in the “Preview” interface.
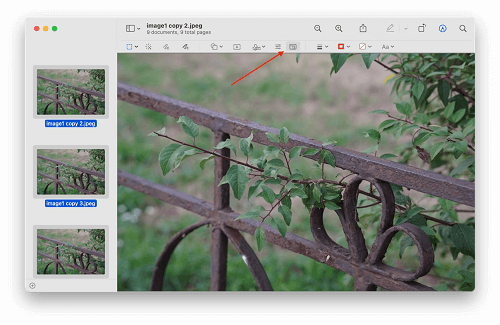
- Navigate to the top of the menu bar in the Preview page and click on the “Markup icon”.
- Click on the “Adjust Size” icon as shown in the image below.

Resize An Image on Mac with Preview
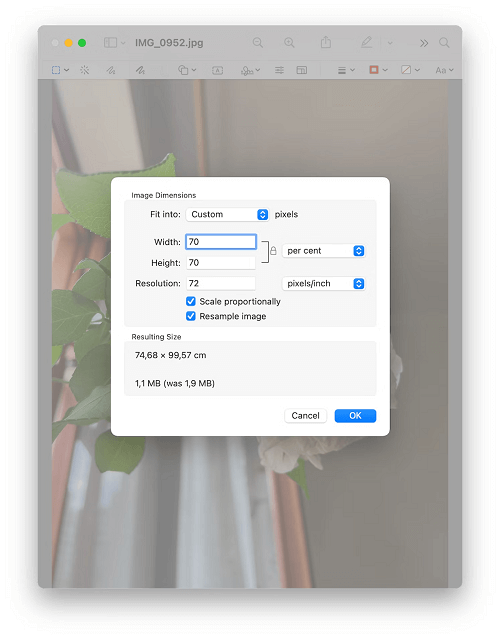
- Next, select your image customization settings from the pop-up window and click on “OK” once you’re done.

Click on “OK” once you’re done
- Finally, check the resized image to see if it suits your requirements. Then, save it to your computer.
How to Resize Single or Multiple Images on Mac Without Losing Quality [Professional]
Although the built-in Preview app on your Mac allows you to resize your images without any issues, it might not be an efficient choice if you want to resize multiple images. So, we recommend Fotor’s Online Image Editor to resize your images without losing quality.
1. What Is Fotor Photo Editing
Fotor – Free Online Resize Images tool is one of the most reputable Image Editor online that allows you to perform both basic and advanced image editing operations like a pro. With this tool, you can easily resize your images for websites, design projects, and lots more in all popular formats like PNG, JPG, and JPEG.

Fotor official logo
Also, if you’re looking to resize your images to meet different social media platform criteria, Fotor supports the present size templates that you can use to get the job done for Facebook, Instagram, and YouTube. All it takes is only a few clicks.
Key Features
- Supports built-in AI tools to fasten image editing tasks like face unblur, image enhancement, etc.
- Offers a wide range of templates that you can use to resize your images for social media within a few clicks.
- Resize your images without manually cropping the file. All you just need is to input your dimension.
- Its simple user interface makes navigation vary straightforward for users at all levels.
See how to make use of Fotor Image Editor below
2. How to Resize An Image on Mac with Fotor
Step 1: Install the “Fotor Image Editor” software on your computer and launch it.
Step 2: Select “Photo Editor” from the menu and upload the “Image” file that you need to resize.
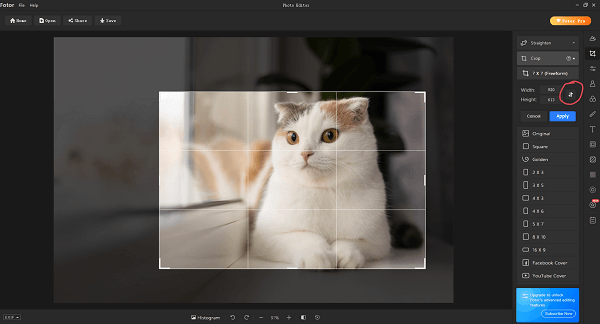
Step 3: Navigate to the right side of the screen and click on “Crop”. Then, enter the relevant values for your image “Width” and “Height”.

Resize An Image on Mac with Fotor
Step 4: After you enter the desired image size, click on “Apply” to confirm your action. Then, click on “Save” at the top-right corner to save the “Image” file to your local storage.
3. How to Resize An Image for Social Media Use with Fotor Directly
If you’re looking to resize an image for your social media posts, use the following steps to get the job done using Fotor;
Step 1: Open “Fotor” on your Mac and click on the “Design” button.
Step 2: Select “Templates” from the top-left corner and choose the template that suits the social media platform you want to use the image.
Step 3: Navigate to the top menu and click on “Resize”. You should see different dimensions that can be used for various social media platforms including Facebook, YouTube, and Instagram. Select your preferred dimension.

Resize An Image for Social Media Use with Fotor Directly
Step 4: Click on “Copy & Resize” to apply the settings. Then, click on “Download” at the top-right corner to save the image in your preferred format.
4. How to Resize Multiple Photos on Mac at Once with Fotor
If you have multiple images that need to be resized, here are the steps to resize them using the Fotor image editor;
Step 1: Open “Fotor” on your Mac and click on “Open Image” to upload one of the image files that need to be resized.
- After that, click on “Batch” at the top-right corner of the screen to add the rest of the “Images”.
Step 2: Click on “Batch Resize” on the left side of the tool’s interface. Then, select “Resize” and enter the target “Height” and “Width” percentages for the images.

Resize Multiple Photos on Mac at Once with Fotor
Step 3: Once you finish, click the “Save” button at the bottom right side to save the images to your computer.
Conclusion
That’s all in today’s guide. As you can see, the steps to resize images on Mac are not complicated. All it takes is only a few clicks. We recommend using the Fotor Image Editor for Mac to edit and resize your images to avoid and problems. Besides, it offers various options to resize your images.
Product-related questions? Contact Our Support Team to Get Quick Solution >

