< Back
-
How to change wallpaper in iPhone?
How to change wallpaper (Lock Screen, Home Screen and Set Both) in iPhone? Please refer to the detailed instruction to tackle this issue:
1. Open iPhone > Go Settings > Click Wallpaper > Choose a New Wallpaper.
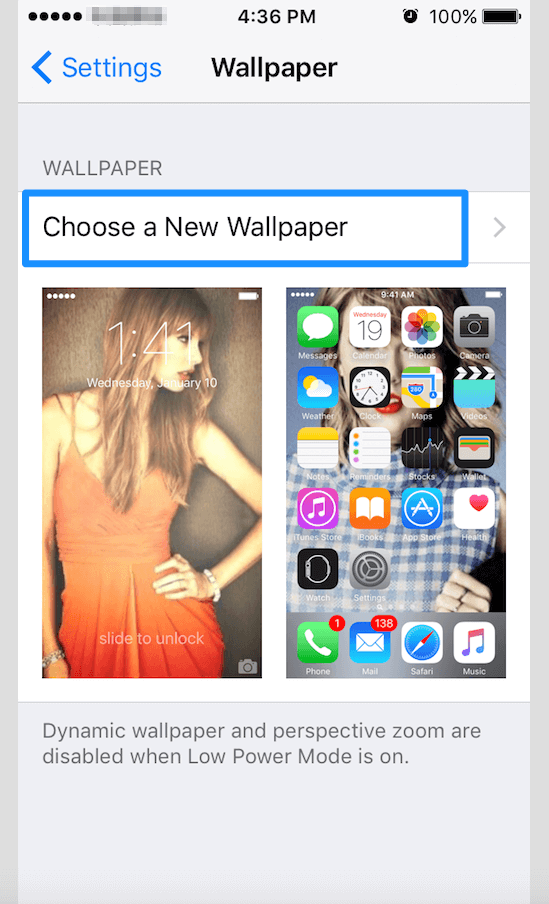
2. You can choose dynamic or stills wallpaper based on your needs. Meanwhile, you can also choose the photo in Camera Roll as the background wallpaper.
How to switch language in iPhone?
How to switch language in iPhone? Please refer to the detailed instruction to tackle this issue:
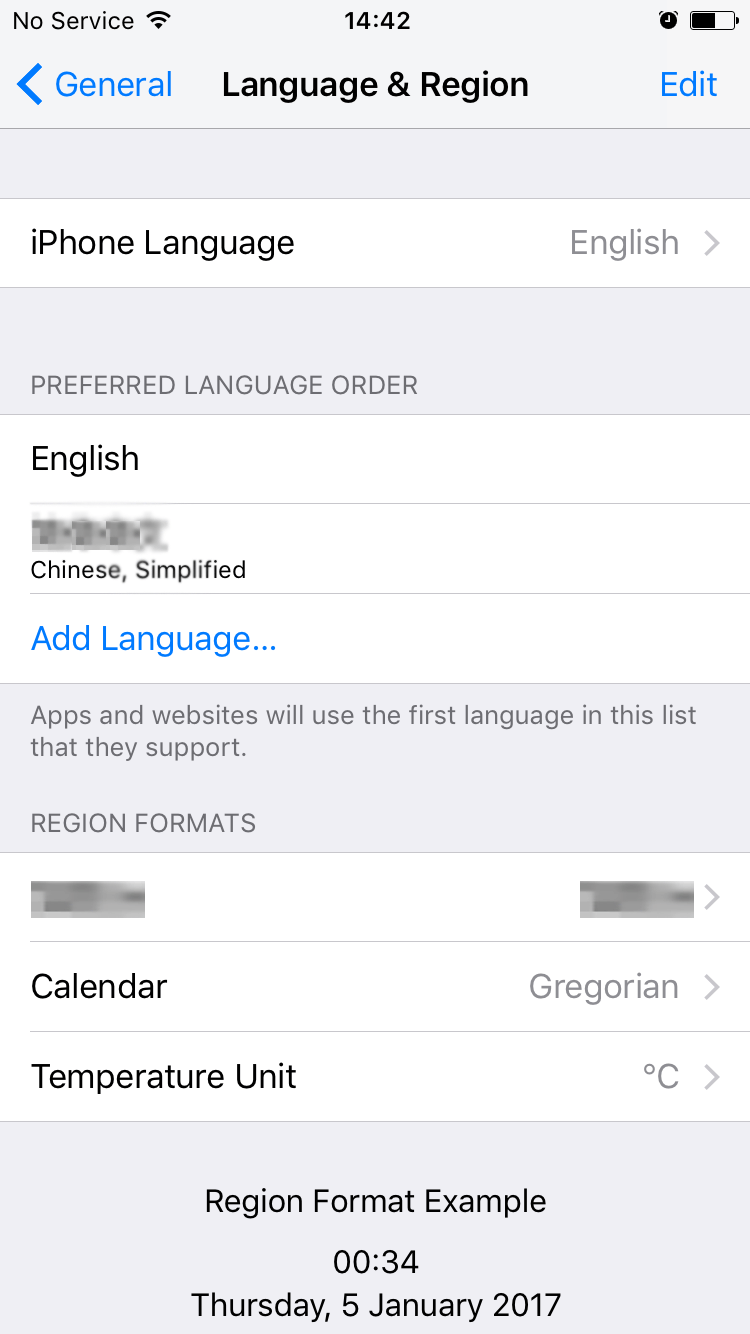
Open iPhone > Go Settings > Click General > Choose Language & Region > Tap iPhone Language > Switch language as you need.
How to adjust the display & brightness in iPhone?
How to adjust the display & brightness in iPhone? Please refer to the detailed instructions to tackle this issue:
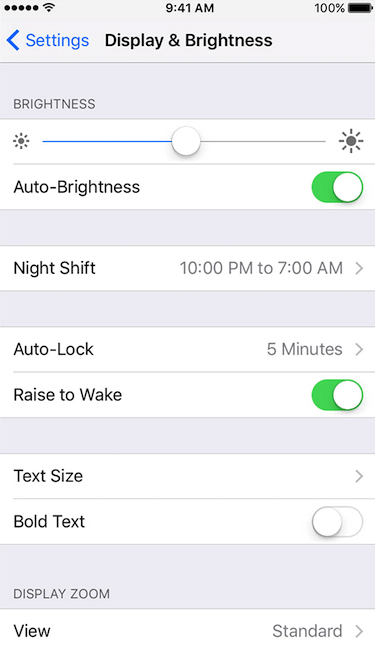
1. Go to Settings > Click Display & Brightness > Drag the slider to the right or left.
2. If your iOS device has an ambient-light sensor, you’ll see an Auto-Brightness setting under the slider. Auto-Brightness uses a light sensor to adjust brightness based on your surroundings. If you want to raise or lower the Auto-Brightness levels, please turn on Auto-Brightness. The brightness slider will move according to the lighting conditions. Now you can use the slider to adjust the Auto-Brightness setting.
How to turn off Find My iPhone option?
How to turn off Find My iPhone option? Please refer to this article to solve this issue:
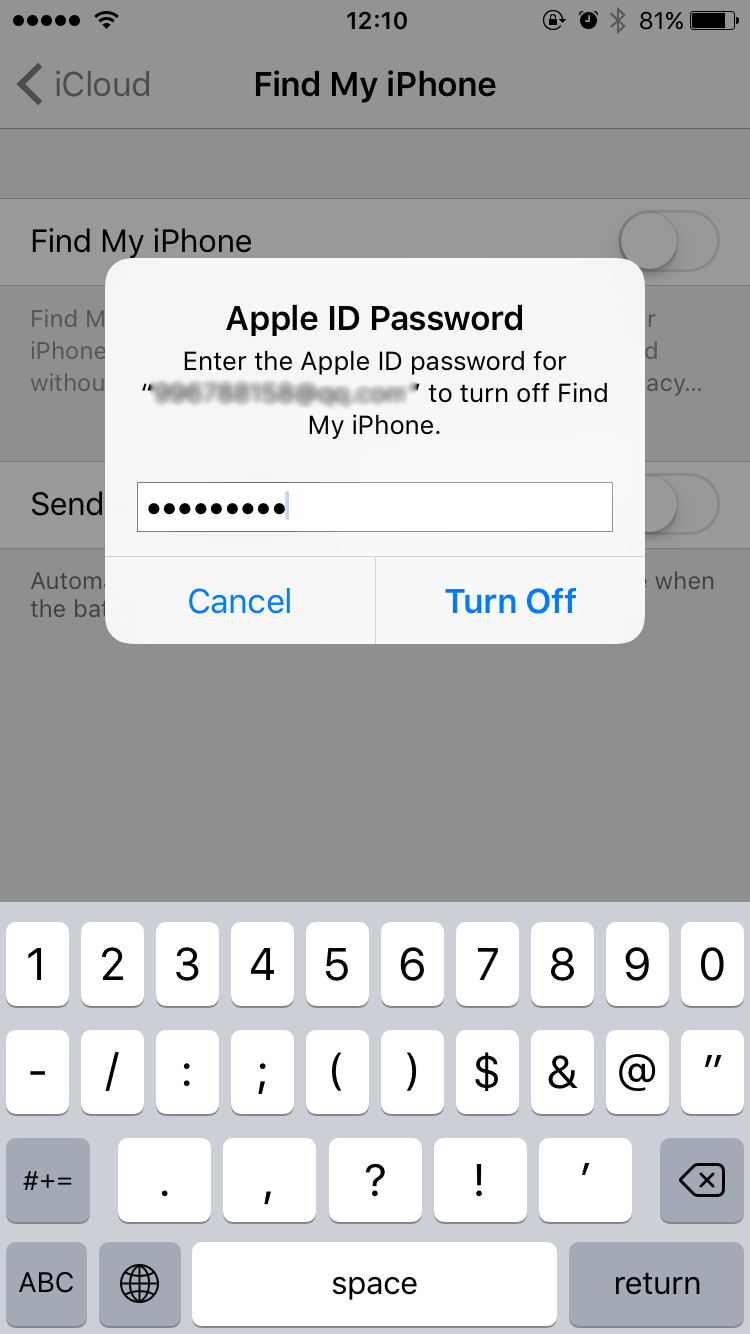
1. Go to Settings > Click iCloud > Click Find My iPhone option > Input the password to disable Find My iPhone.
2. Meanwhile, please ensure your iPhone is connected a Wi-Fi network or enable Cellular when you input the password of your Apple ID to turn it off.
How to set date and time in your iPhone?
Once you get a new iPhone, you may need help to set the date and time in your iPhone. Below are suggestions of how to set date and time in your iPhone.
1. Turn on Set Automatically in Settings > General > Date & Time. Once you turn on Set Automatically, your date and time will be set automatically based on your time zone.
2. Check whether your device shows the correct time zone in Time Zone, which is under Set Automatically option.
3. Set the date and time manually. Go to Settings > General > Date & Time and then turn off Set Automatically option.
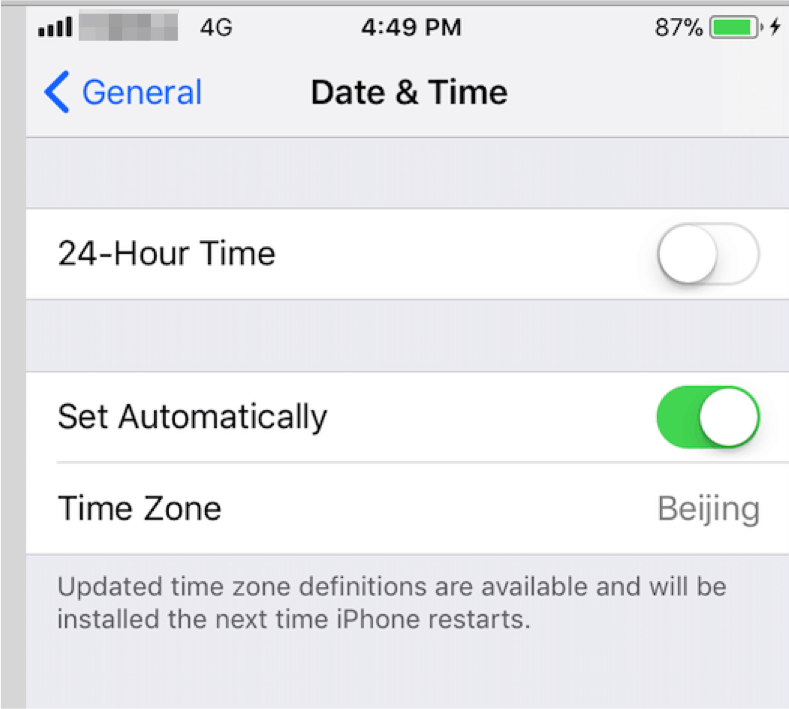
4. Show 24-hour time or 12-hour time. Go to Settings > General > Date & Time, then turn 24-Hour Time on or off (not available in all areas).
What’s about the Family Sharing feature of iPhone?
iOS 8 and later can allow one credit card holder to add up to five family members to its Family Sharing feature. Anyone in the group can share purchases from iTunes, iBooks, and App Store. Users can also get access to a family photo album, a family calendar and locations.
How to restore iPhone to factory settings?
To restore the iPhone to factory settings, please refer to the instructions below:
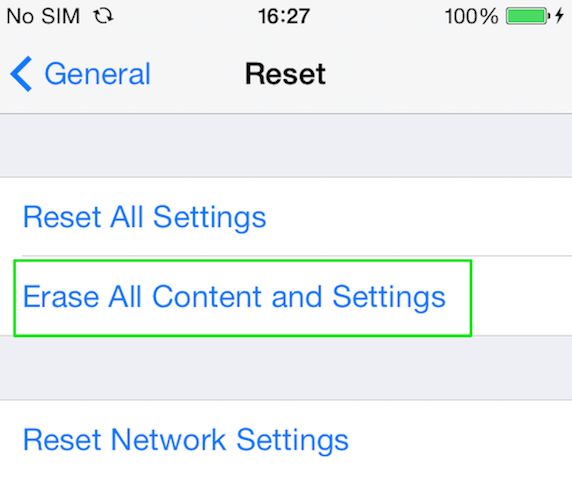
1. Go Settings > Click General > Find out the "Restore" option at the bottom of this page > Choose" Erase All Content and Settings" option.
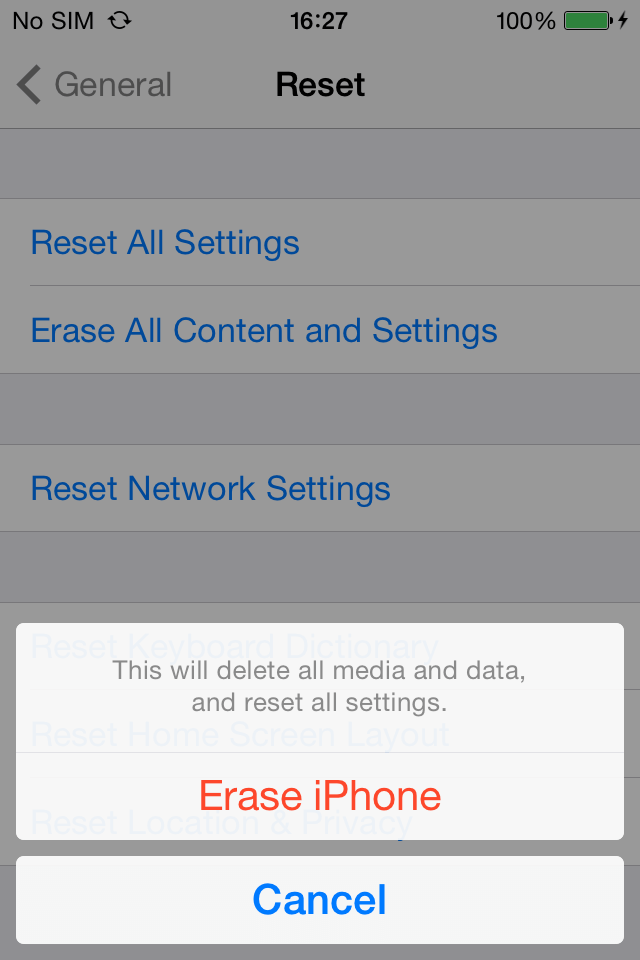
2. Enter your passcode in the pop-up window > Click the red "Erase iPhone" button.
Note: Given the importance of your data, please backup the important data in your iPhone prior to restore it to factory settings.
-
How to set touch ID with an iPhone 5s or later?
Touch ID is a fingerprint identity sensor that can facilitate your use of iPhone. Please refer to the detailed instructions to set touch ID if you are using an iPhone 5s or later.
1. Go to Settings.
2. Tap Touch ID & Passcode and enter your passcode if you already have one.
3. Tap Add a Fingerprint and place the finger you want to register on the Home button until you feel a quick vibration.
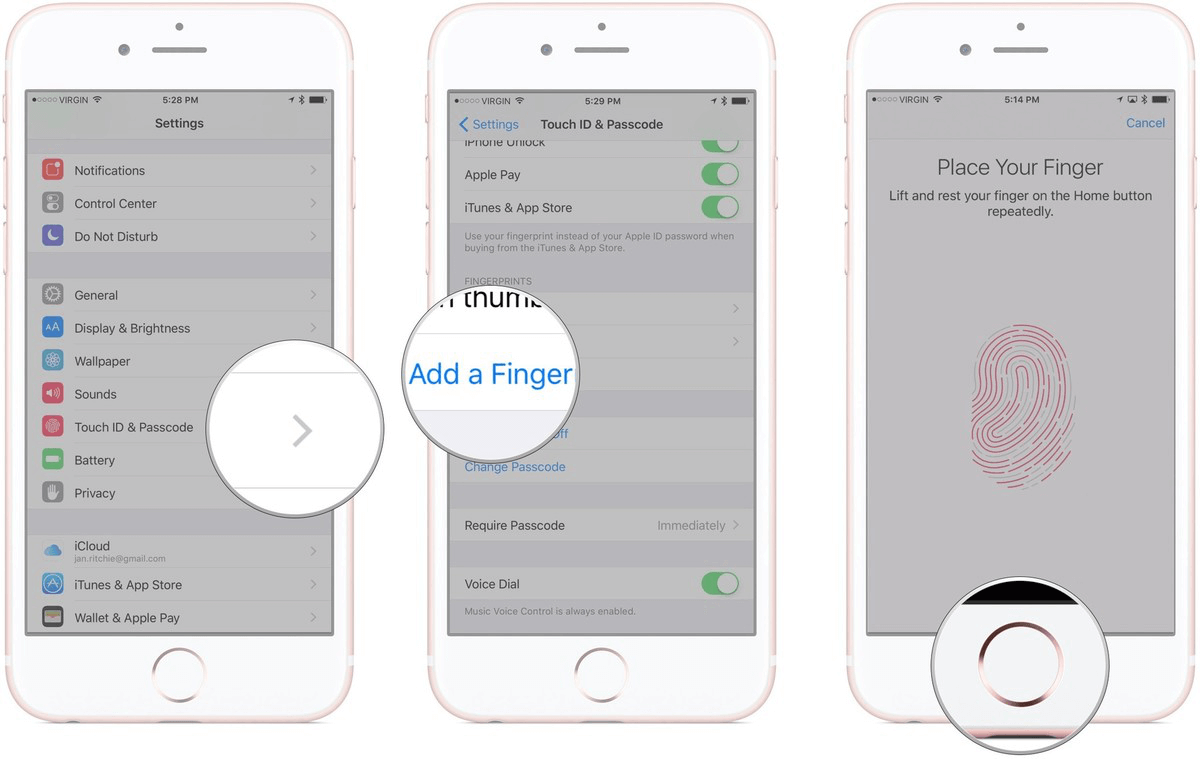
4. Continue to lift your finger up and place it back down and repeat each time you feel a buzz.
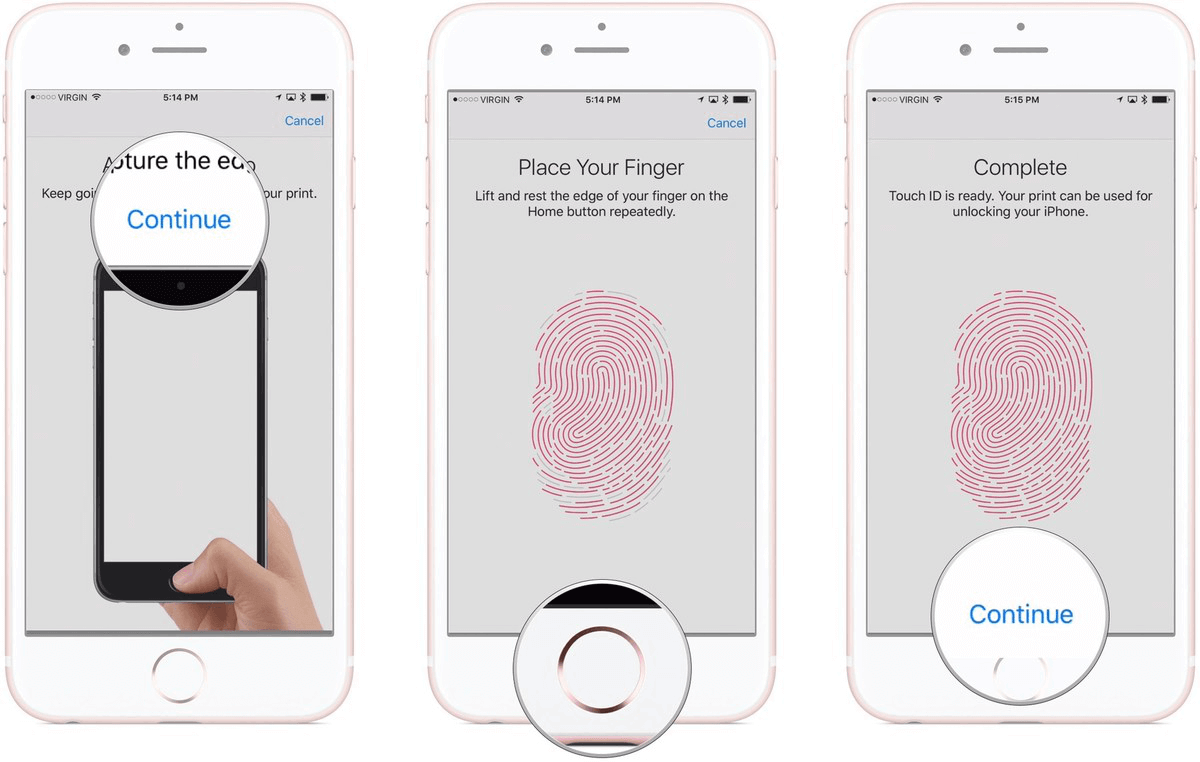
5. Now screen asks you to adjust your grip to acquire your peripheral data. Place the edges of the finger you want to register with the outer areas of your fingertip on the Home button and leave it there until you feel a buzz.
6. Tap Continue to finish the setting of touch ID.
How to block caller in iPhone?
If you want to block the caller who confused you, the following article may help you.
Open iPhone > Find Phone icon on the main screen > Choose the contact you want to block > Click Edit on the upper right of the screen > Choose Block This Caller option > Tap Block Contact in the next pop-up window.
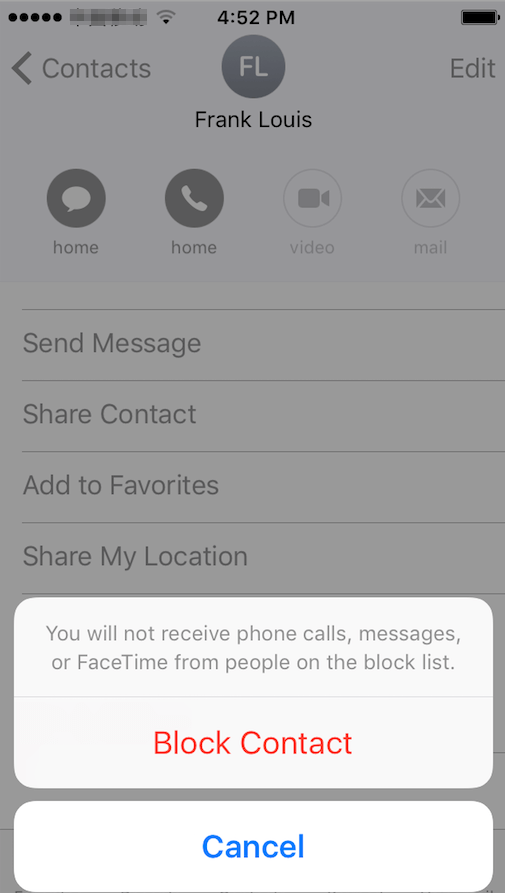
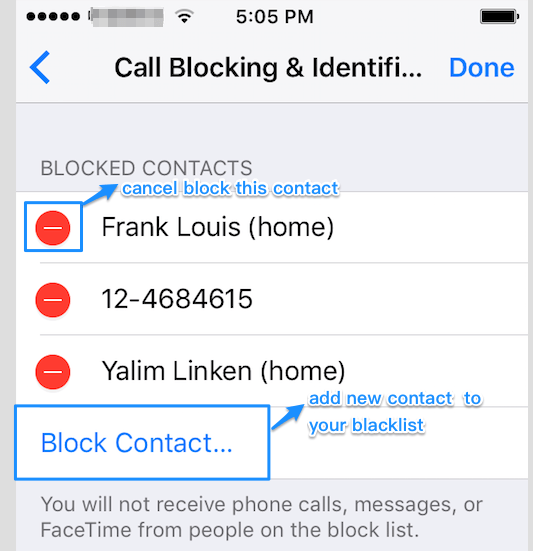
Now you can check the contact you blocked or add more contacts to your blacklist in Settings:
Go to Settings > Tap Phone option > Find Call Blocking & Identification option > Now you can see all blocked contacts on your iPhone's blacklist > Click “Edit” to cancel block the contact or add new contact to your blacklist.
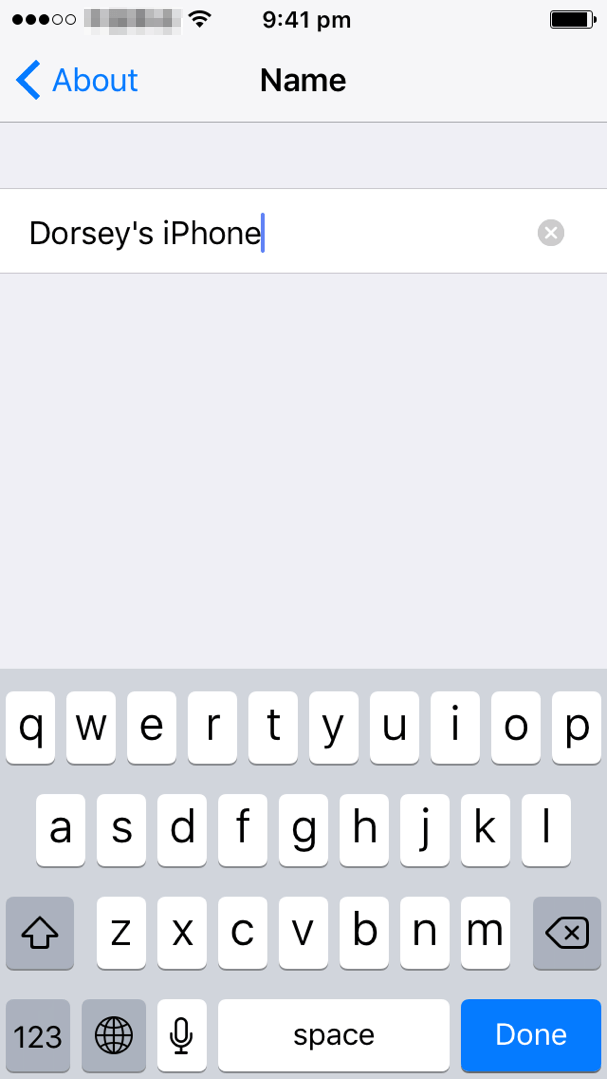
How to Set up your iPhone Name?
If you want to change the name of your iPhone, please follow these steps:
1. Go to Settings on your iPhone > Tap General > Tap About.
2. Type the name your preferred.
3. Tap Done.
How to Set up your iPhone?
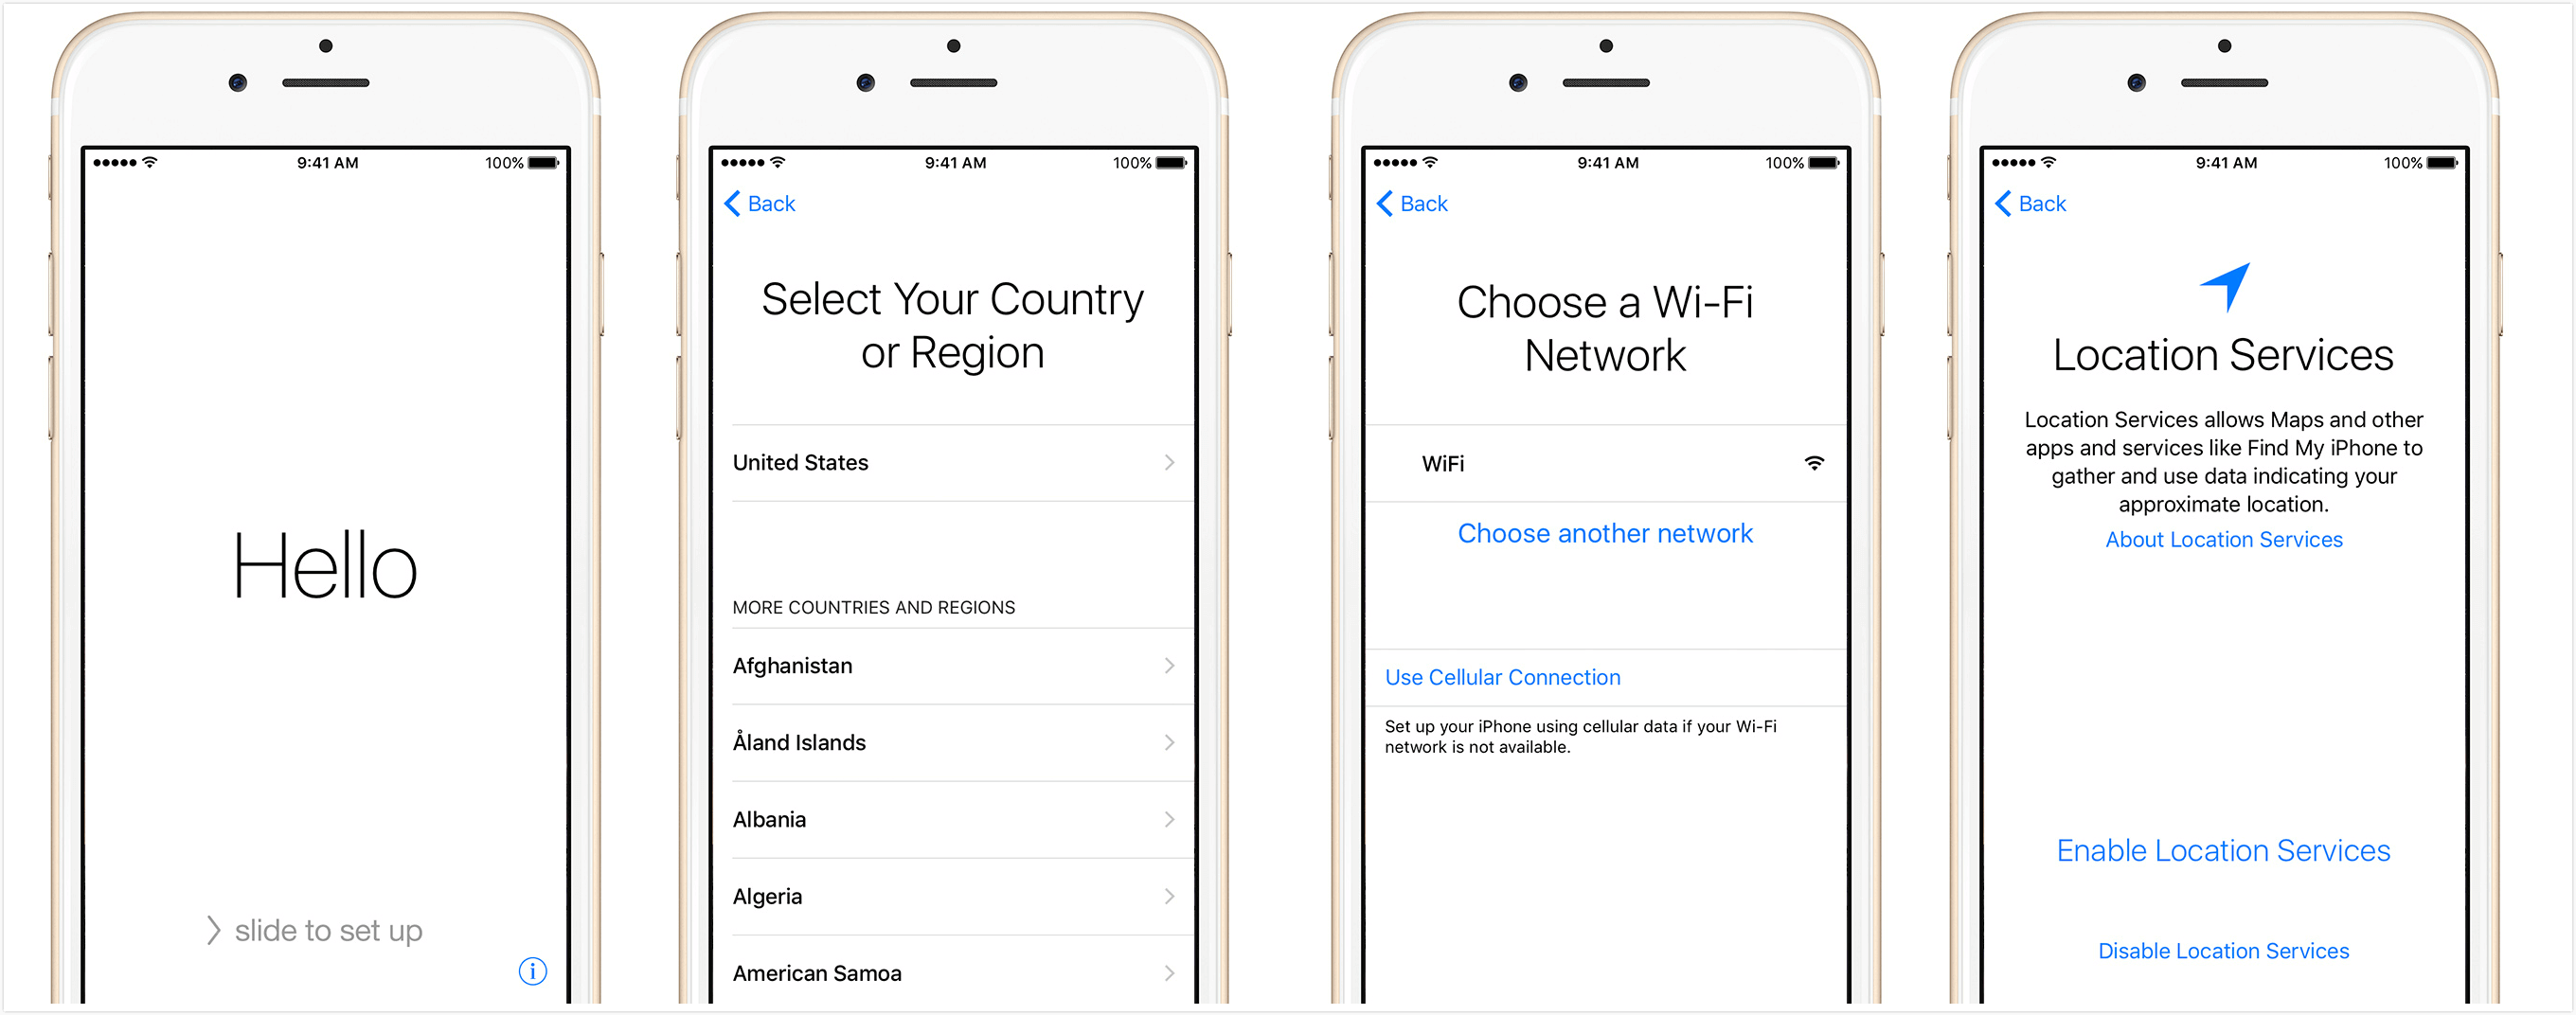
If you just get a new iPhone, the first thing is to set up and activate your new iPhone. Please follow the steps below to put your new iPhone into use in minutes. Here we take iPhone 7 for example:
1. Turn on your iPhone by pressing the Wake/Sleep button.
2. You will see the "Hello" screen in different languages. Please drag "slide to set up" to continue.
3. Choose the language you want and select your country or region to enable Location Services.
4. Choose a Wi-Fi network and make sure your iPhone 7 is connected with stable Wi-Fi. If you'd rather use your cellular network, just tap on Use Cellular Connection.
5. Enable Location Services or disable Location Services. This feature aims to detect your location through the GPS and Wi-Fi/Cellular triangulation.
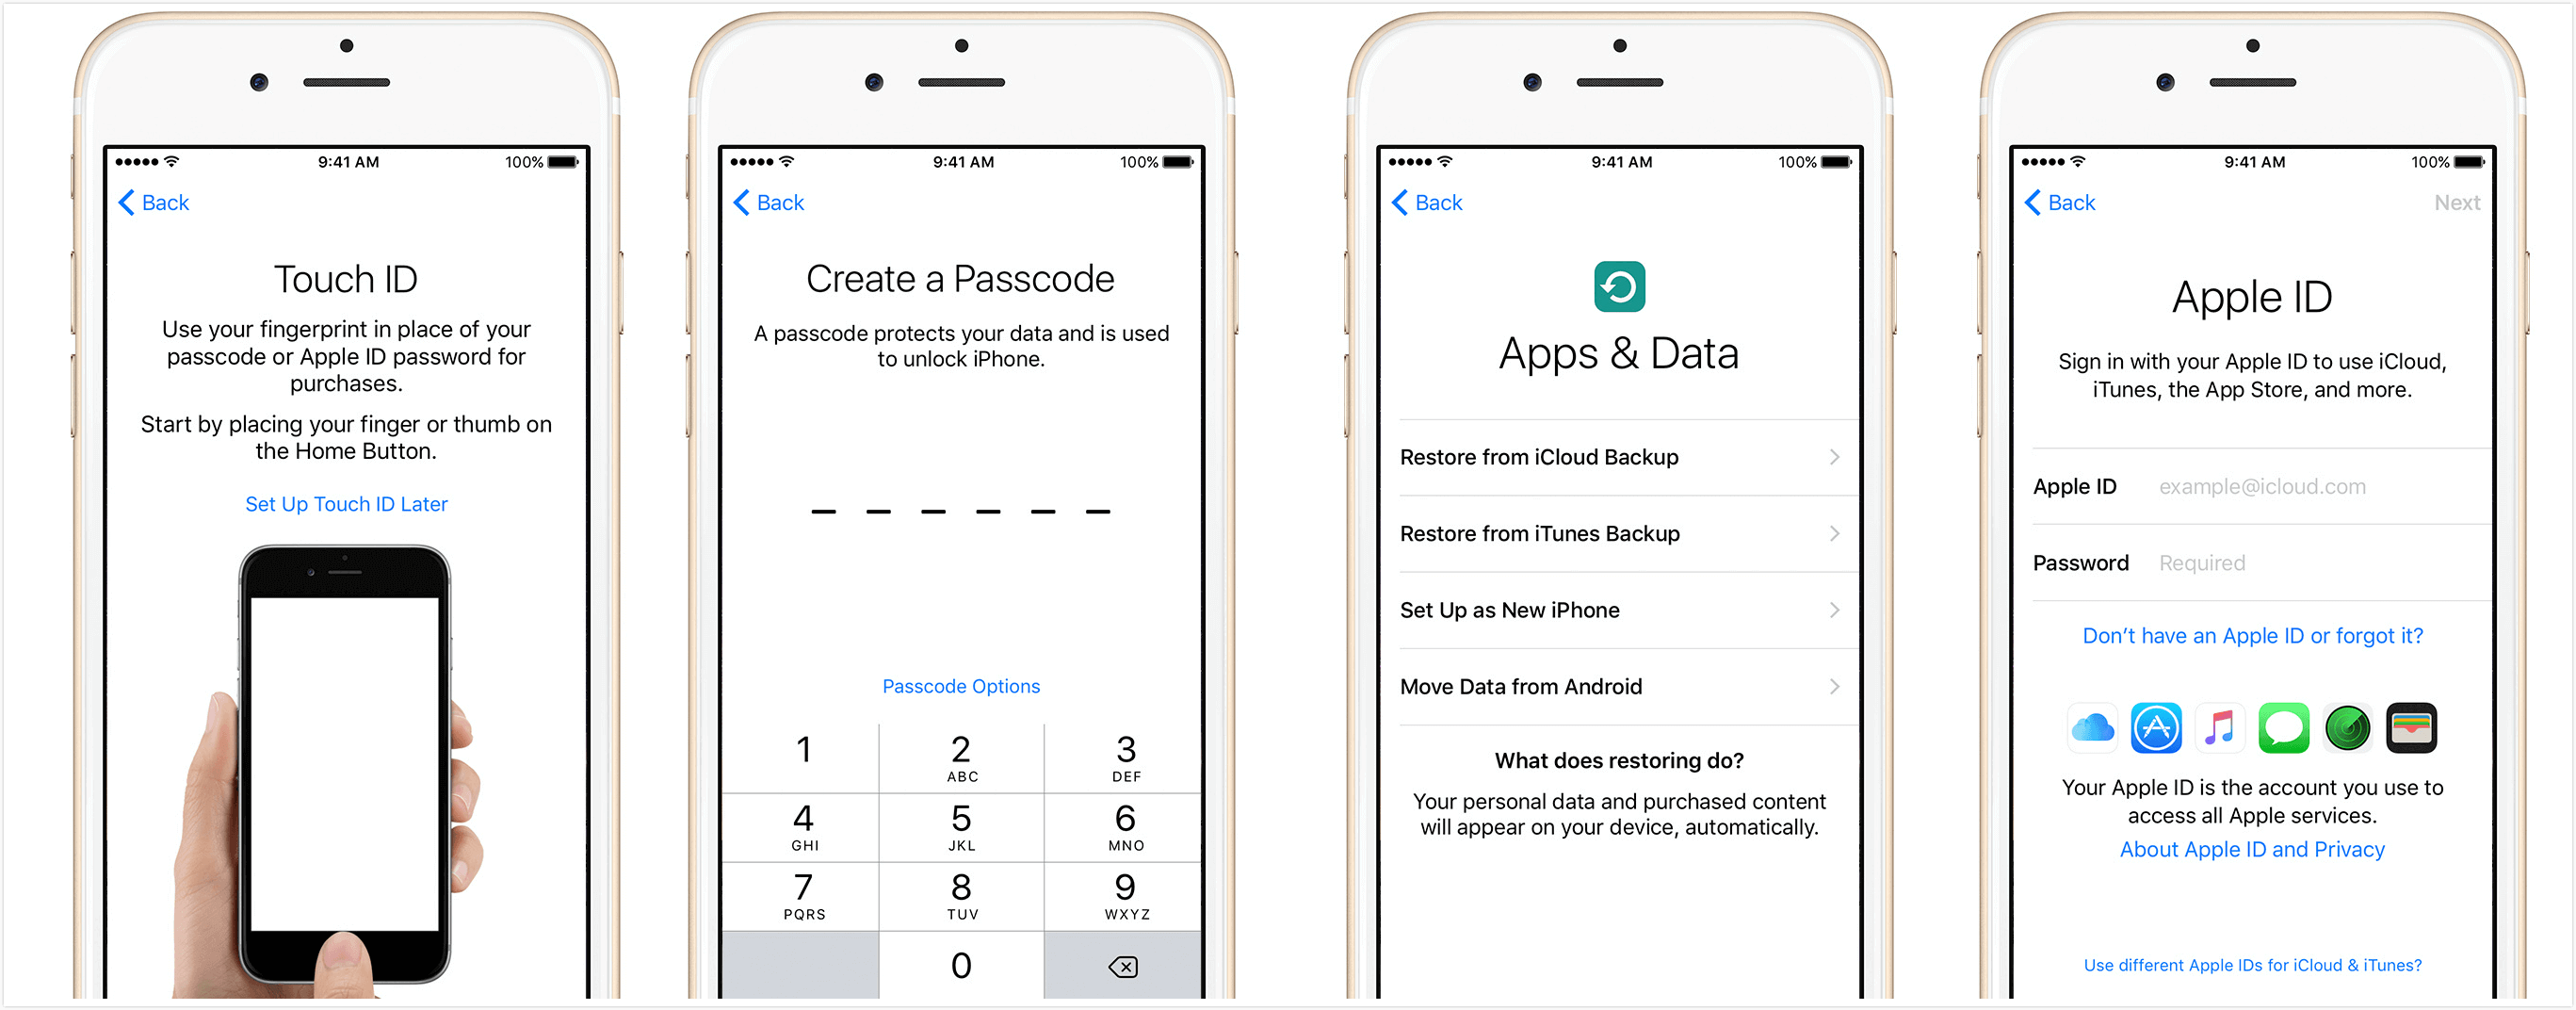
6. Sign in with Apple ID and password (If you don’t have one, please set a new Apple ID according to the instructions). Your Apple ID is used to make purchase from the App Store and iTunes, and to log into iCloud services.
How to install the SIM card in iPhone?
If you are given a SIM card, please install it before setting up your iPhone. And before putting SIM card in iPhone, please make sure that you have the right size SIM card. Then, please follow steps below to install it.
1. Power down your iPhone.
2. Find the SIM tray on the side.
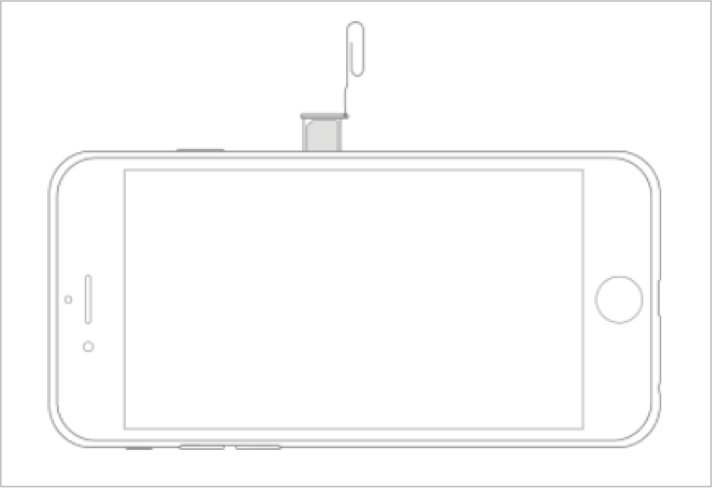
3. Use your SIM eject tool or a small paperclip. Push the tool or paperclip into the small hole next to the SIM slot to get the SIM tray out of the iPhone.
4. Put your SIM card in the tray carefully. Please only the SIM tray that came with your iPhone.
5. Push the tray back into the iPhone and press to close the tray completely.
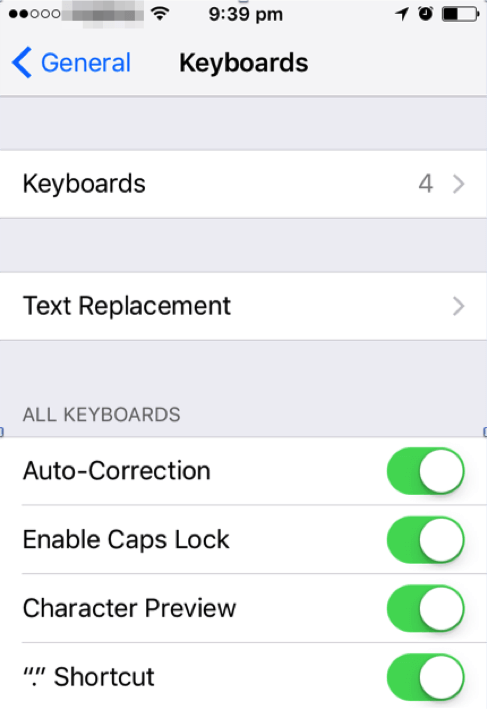
How to set keyboards of your iPhone?
Anytime you need to type on your iPhone, it will bring up the default qwerty keyboard instinctively. However, to communicate in different languages, some people may need to add additional built-in keyboards. Please follow the steps below to set keyboards of iPhone:
1. Launch Settings from your Home screen.
2. Tap General and then scroll down the menu.
3. Tap Keyboard and then go into Keyboards.
4. Tap Add New Keyboard option and choose keyboard you want from the following lists.
How to turn on Low Power Mode on iPhone?
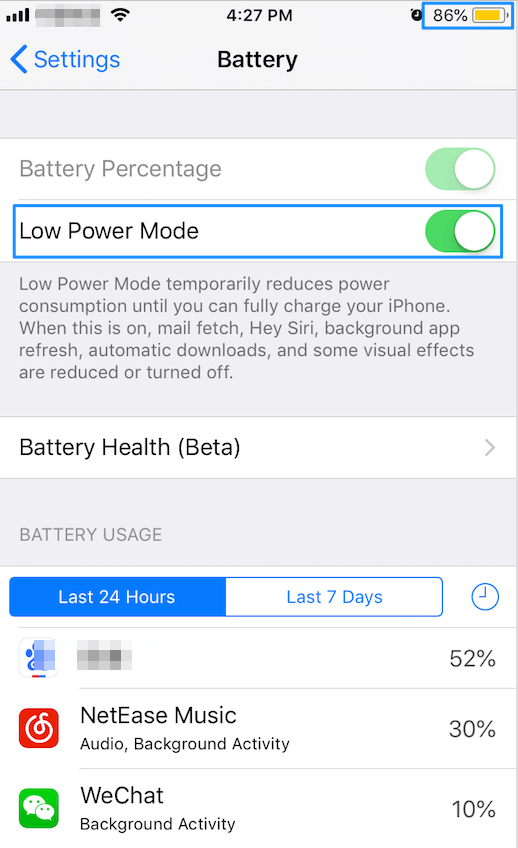
When your iPhone’s power is less than 20%, there will be a pop-up message on your screen to ask if you want to turn on Low Power Mode. But since the power consumption of iPhone is a little fast, you can also try to turn on Low Power Mode when you outside and can’t charge your iPhone in time. It is easy to do so:
Go to Settings > Tap Battery > Switch Low Power Mode into green > Then you will see your battery will be changed into yellow.
How to enable HD voice on your iPhone?
HD voice is provided by T-Mobile and Verizon, which delivers clearer and more natural sounding audio. It places calls over 4G LTE data networks, instead of the traditional circuit-switched networks. HD Voice is available on iPhone 6 and newer models, including iPhone X, iPhone 8 and iPhone 8 Plus.
To enable HD voice, please go to Settings > Cellular > enable LTE > select Voice and Data.
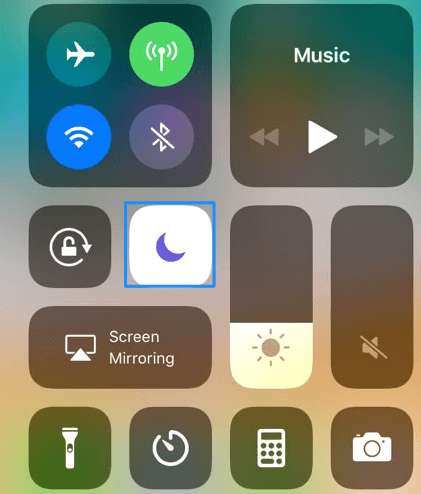
What is the moon icon in Control Center?
The Moon icon in Control Center is a toggle for the Do Not Disturb feature on your iPhone. If you tap this icon and activate Do Not Disturb feature, all notifications will be prevented until you disable it. Thus it is highly recommended to activate Moon icon when you want to keep away from noise in your office time or sleeping time.
-
How to change Apple ID on iPhone?
How to change Apple ID on iPhone? The detailed instruction will help you solve this issue:
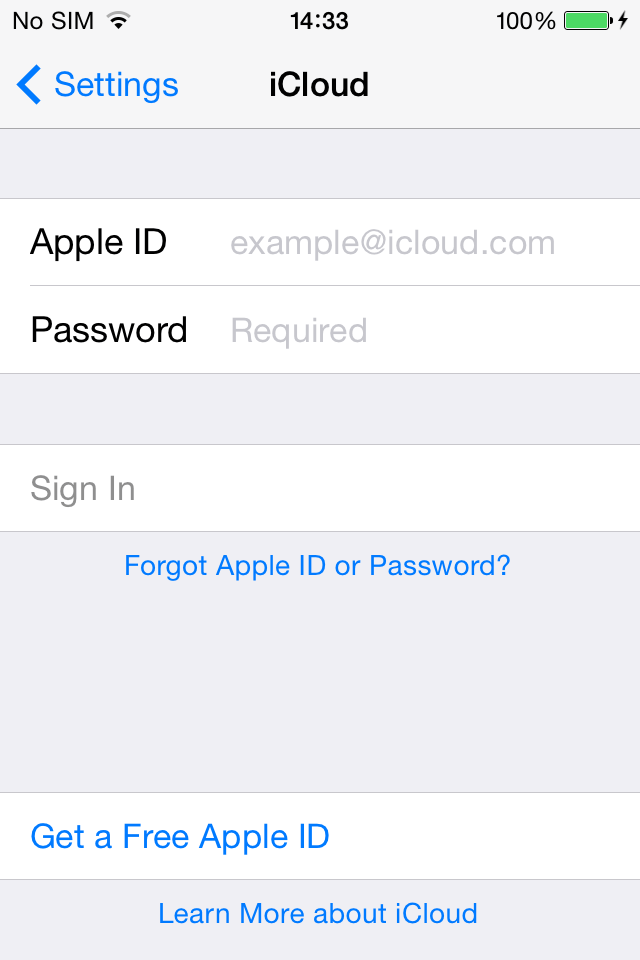
1. Go Settings > Click iCloud > Find out this option "Delete Account" at the bottom of this page > Click "Delete Account" and you will see this interface.
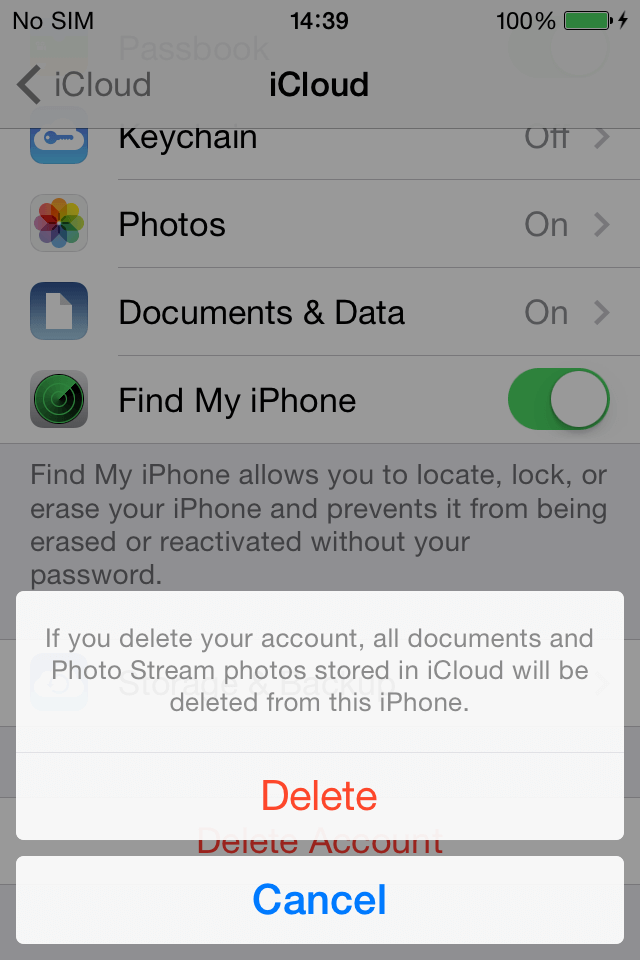
2. Click "Delete" > Go back to iCloud > Input the Apple ID and Password to sign in a new account.
-
How to lock my iPhone?
How to lock iPhone when it is lost? This post provides you with detailed instructions.
1. Please make sure that the option "Find my iPhone" is turned on before your iPhone is lost.
2. Log into iCloud website ( https://www.icloud.com/ ) on computer > Choose "Find My iPhone" option > Input your iCloud password > Select the iPhone you want to locate from the drop - down box under All Devices > Choose Lost Mode from the three modes: Play Sound, Lost Mode and Erase iPod > Enter a four-digit/ six-digit password.
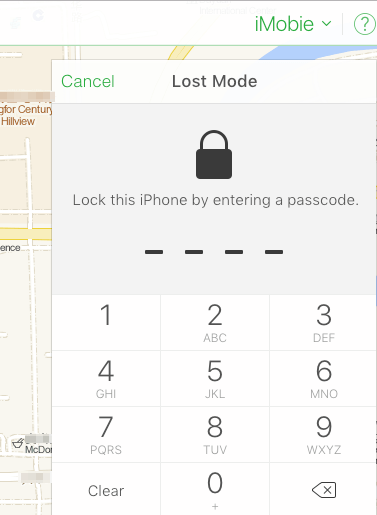
3. Enter relevant information according to the prompt. Then if your iPhone was locked successfully, the relevant information you inputted will be shown on the lock screen. Meanwhile, locking iPhone process requires internet connection. Thus, please make sure there is internet connection during this process.
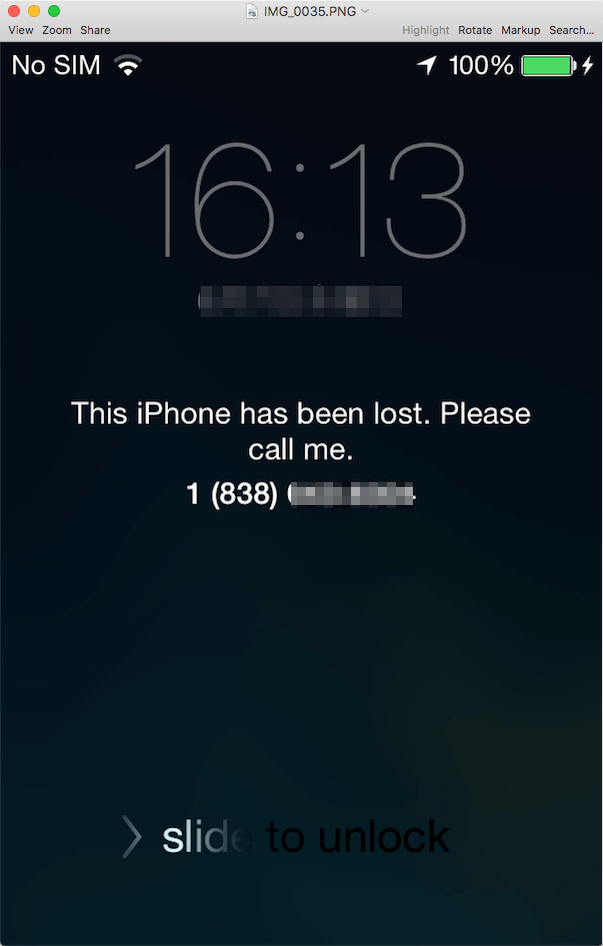
4. If you want to unlock your iPhone after find it back, please drag " slide to side " to right on the lock screen. Now please enter the password you set before to unlock your iPhone.
How to remove your passcode if you forgot the passcode of your iPhone?
How to remove your passcode if you forgot the passcode of your iPhone? If you made a backup with iTunes before you forgot your passcode, now you can use iTunes to tackle this issue quickly.
1. Connect your iPhone to the computer you synced with before.
2. Open iTunes and wait for it to sync your iPhone.
3. Make a backup.
4. After the backup have finished, click Restore "iPhone" (your device name).

-
How to set ringtones for your iPhone without iTunes?
Changing a special ringtone with iTunes to personalize your iPhone is complicated and time-consuming. This article may help you to tackle this issue in an easy way.
1. Download and install AnyTrans on your Windows/Mac computer, and connect your iPhone to it.
2. Scroll down, click on Audio button, and choose Ringtones.
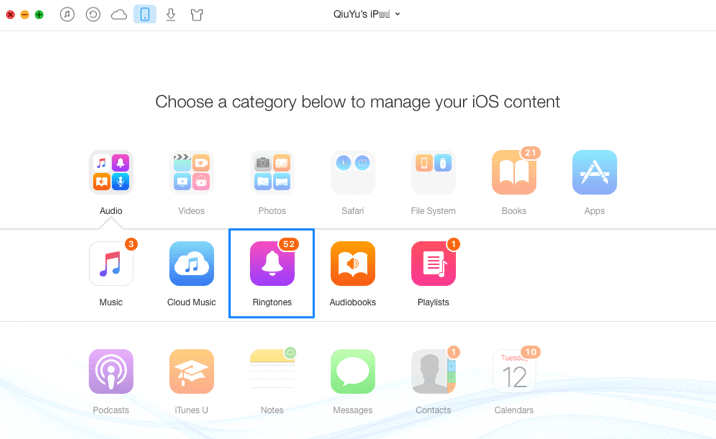
3. Click
 button on the right hand corner, and then please browse the song you want to set as ringtone from your computer. After that, please click the Open button to start transferring.
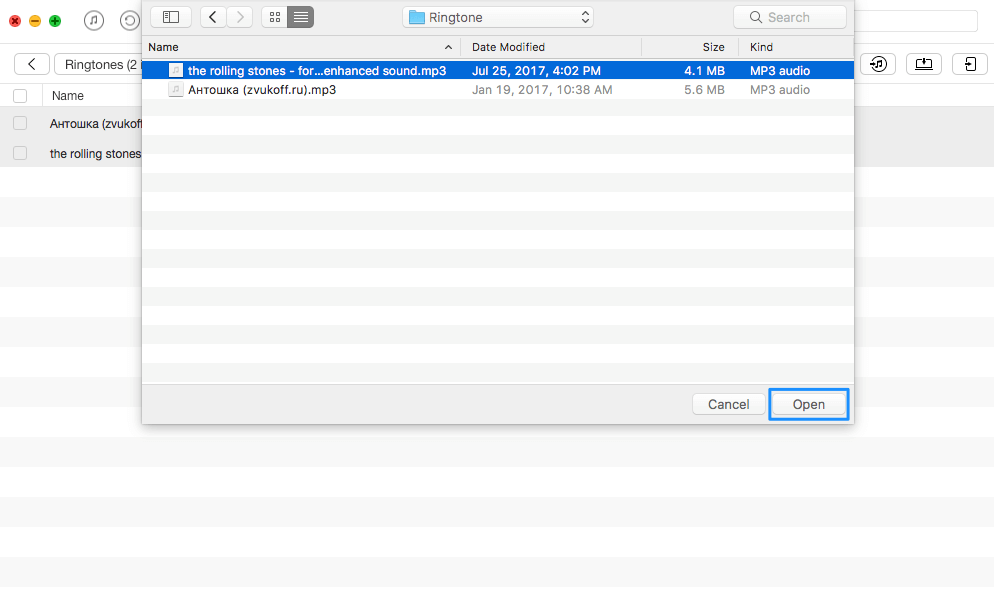
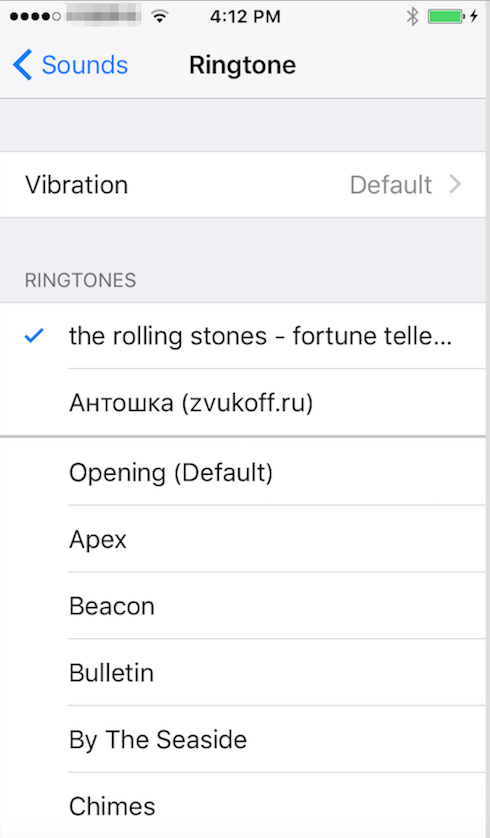
4. Now please open your iPhone and go Settings > Choose Sounds > Tap Ringtone > Find the ringtone you transferred and set it as your iPhone’s ringtone.
5. Meanwhile, you can also keep the ringtone for 25 seconds, 40 seconds, or the original length by click the menu tab of AnyTrans and set the length of your transferred ringtone in Preferences based on your needs.
What to do if your Apple music is not working on iPhone?
If your Apple music is not working after iOS update, the solutions below may help you fix this issue.
1. Turn airplane mode on and off. Go to Settings to turn on the Airplane Mode. Wait a few seconds and turn back off again.
2. Restart your iPhone. Restart your device and the Music app, then swipe up on the Music app to close it. Finally, relaunch the Music app.
3. Reset network. Go to Settings > General > Reset > Reset Network Settings.
4. Update iTunes to its latest version.
5. Try different ways to launch Apple music. Go to Settings > Music > Join Apple Music.
-
How to uninstall apps in iPhone?
To uninstall apps in iPhone, please refer to detailed instructions below:
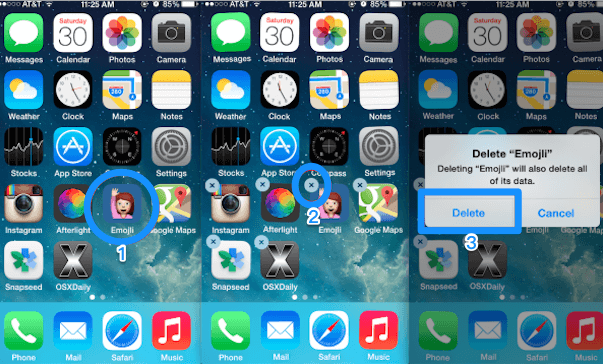
1. Locate the app icon you wish to uninstall from the Home Screen of your iPhone. Tap and keep holding on the app icon you wish to uninstall until the icons start vibrating.
2. Then the delete option (X) icon will appear in the upper left corner of the app icon that you hold on. Please tap it to delete your unwanted app.
3. Confirming the removal of the app by choosing “Delete” in the next pop-up window: Deleting “ x x ” (your app name) will also delete all data.
How to make use of the Settings App in your iPhone?
Once you're more familiar with iPhone, you may want to take some time to customize your device's Apps settings. The Settings app is on the Home screen. You can use it to configure many of settings in iPhone. For example, to select sounds to play during certain events (such as when you receive a text message): tap Settings and then tap Sounds (Settings > Sounds). You can also use Settings to:
1. Under Touch ID & Passcode, you can customize the security for unlocking your iPhone. By default, the iPhone requires a passcode to unlock it. If you have an iPhone 5s or a newer version, you can also unlock your iPhone using your fingerprint with a feature called Touch ID.
2. Under General, you can customize different settings that control your storage, accessibility, overall preferences, etc.
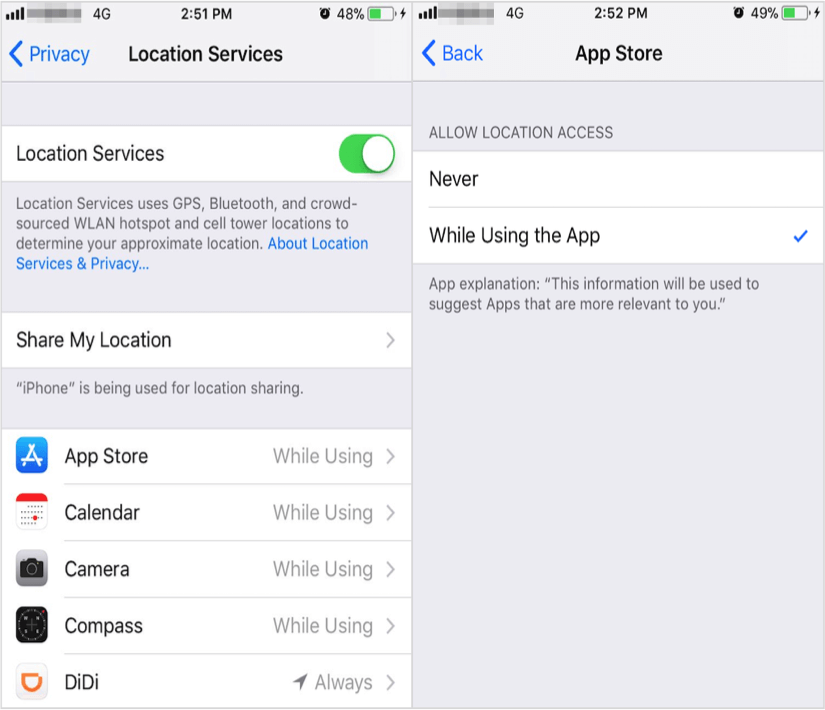
3. Apple has added an increasingly sophisticated app permission system to iOS device over the years. Under Privacy, you can see which apps have access to things like your location, photos, and other personal things.
How to organize apps with folders on iPhone?
To find your apps more easily, you can organize apps in folders on your iPhone based on categories, like Entertainment (you can put Music, Video, Travel, Camera apps here), Productivity, Office, or you can create your own folder name, and then simply drag and drop the related app icons into the specific folders you just created.
1. Create a folder. Touch and hold any app on the Home screen until you see the app icons jiggle. Drag one app onto another you want in the same folder then lift your finger. Tap the name of the folder to rename it. Drag apps into or out of the folder. Press the Home button when you finish.
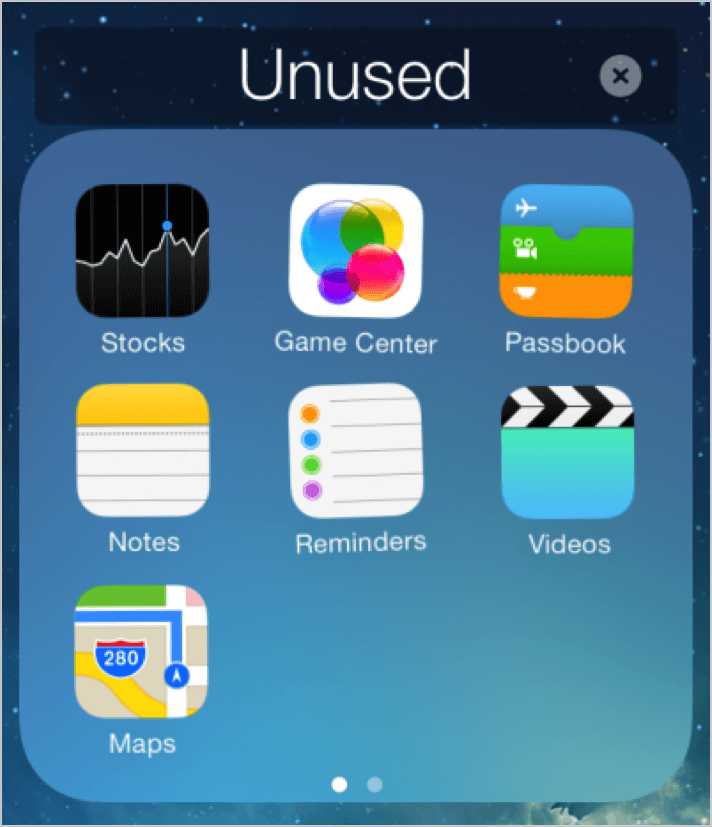
2. Delete a folder. Tap a folder and then drag out all the apps—the folder is deleted automatically.
How to use Find My Friends app in your iPhone?
Find My Friends is an application and service for iOS users developed by Apple Inc. You can share locations with friends, families, colleagues, and more wherever and whenever you want. It’s easy to set up this app. So let’s take a look at how to use Find My Friends in iPhone with some very simple steps to get you started.
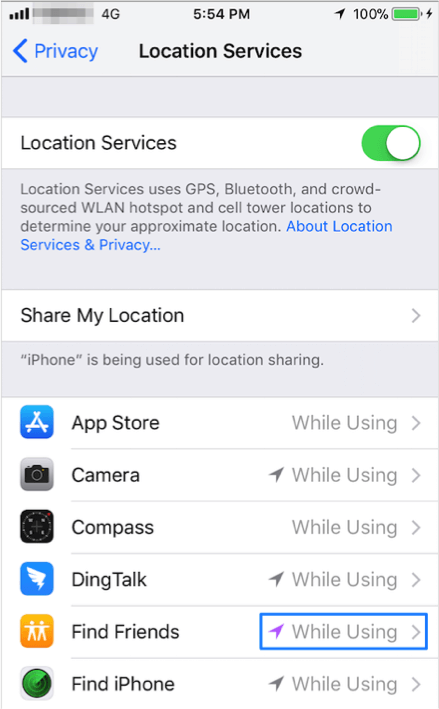
1. Find Location Services and switch it on in Settings > Privacy.
2. Tap Find Friends in the list of apps under Location Services and select While Using.
3. Go back to your home screen and tap Find My Friends app. Once you’ve located and opened the app, you can share locations with others.
How to close background apps on your iPhone?
It is necessary to close apps that you aren't using, especially for the apps that require the network connection. Since they are constantly updating and draining your battery.
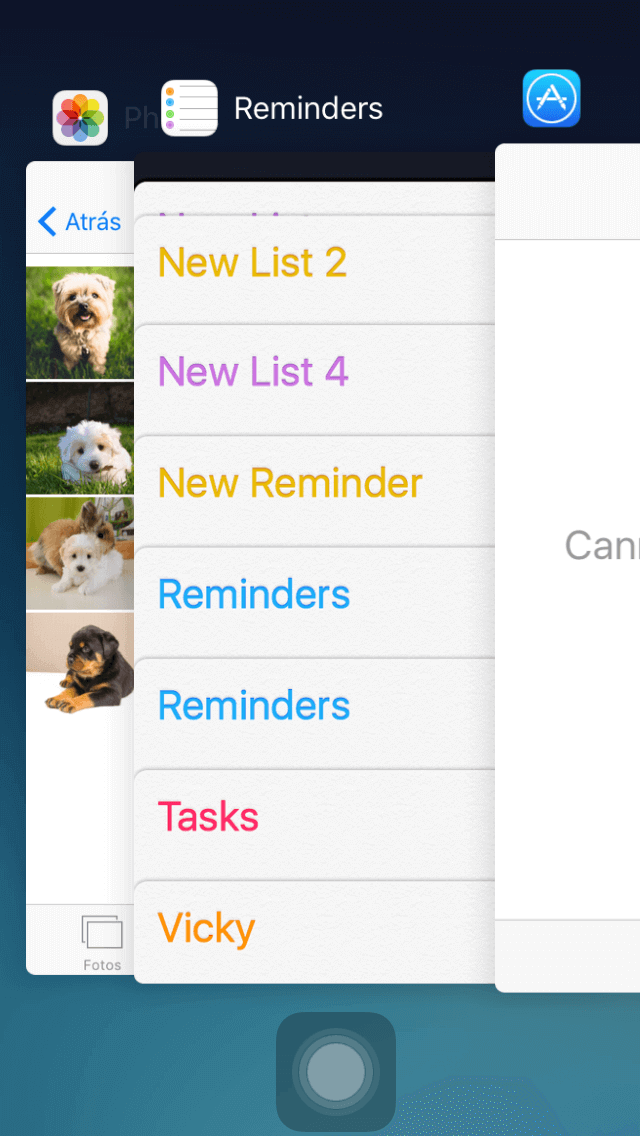
To close background apps on iPhone, you can double-click the Home button to bring up all the apps running in the background, and then swipe upwards to close them.
How to disable in-app prompts for ratings and reviews on your iPhone?
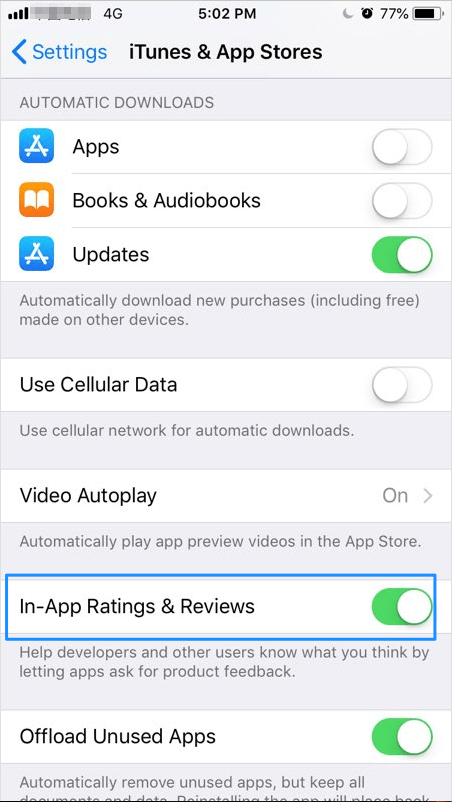
If you are bothered by the constant reviews and ratings of some apps, this article would help you to forbid apps from asking you to rate and review them in the App Store.
Please go to Settings > iTunes & App Store > toggle off In-App Ratings & Reviews.
-
How to connect your iPhone to the internet?
Getting on the Internet with your iPhone depends on what connections are available. Please kindly refer to this article to tackle this issue.
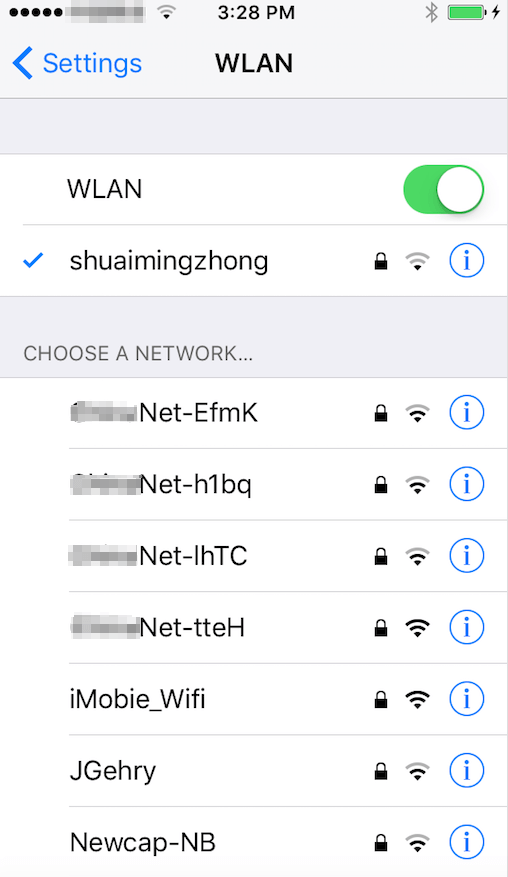
You can connect to the Internet via a Wi-Fi network. It is easy to do so: Go Settings > Tap WLAN > Switch WLAN on > Available Wi-Fi networks will appear > Choose the Wi-Fi network you want to connect to > Enter the wireless password and tap Join.
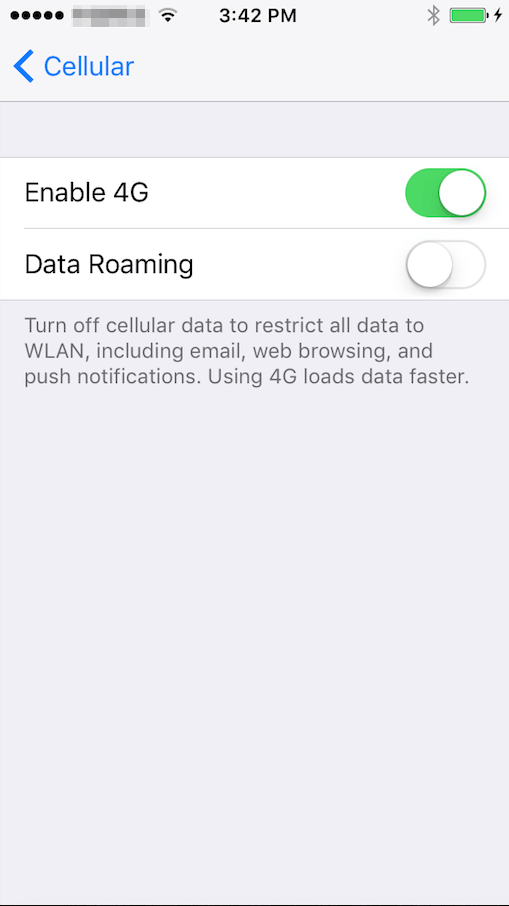
You can also use the Cellular data network: Go Settings > Tap Cellular > Switch Cellular Data on > Enable 4G access in Cellular Data Options > You should now be connected to the internet.
What to do if Wi-Fi is slow on your iPhone?
Some iPhone users may encounter such issue that Wi-Fi is very slow, so that they have to take longer time to load a web-page, download an app, or watch videos online. If your iPhone also has the same problem, please refer to these steps to check it is a network problem or iPhone problem.
1. Update the iOS to the latest version.
2. Reset Network Settings to Flush Network as follows:
Go to Settings > General > Reset > Reset Network Settings. This will clear the network caches, and you also need to input the password of your Wi-Fi network again.
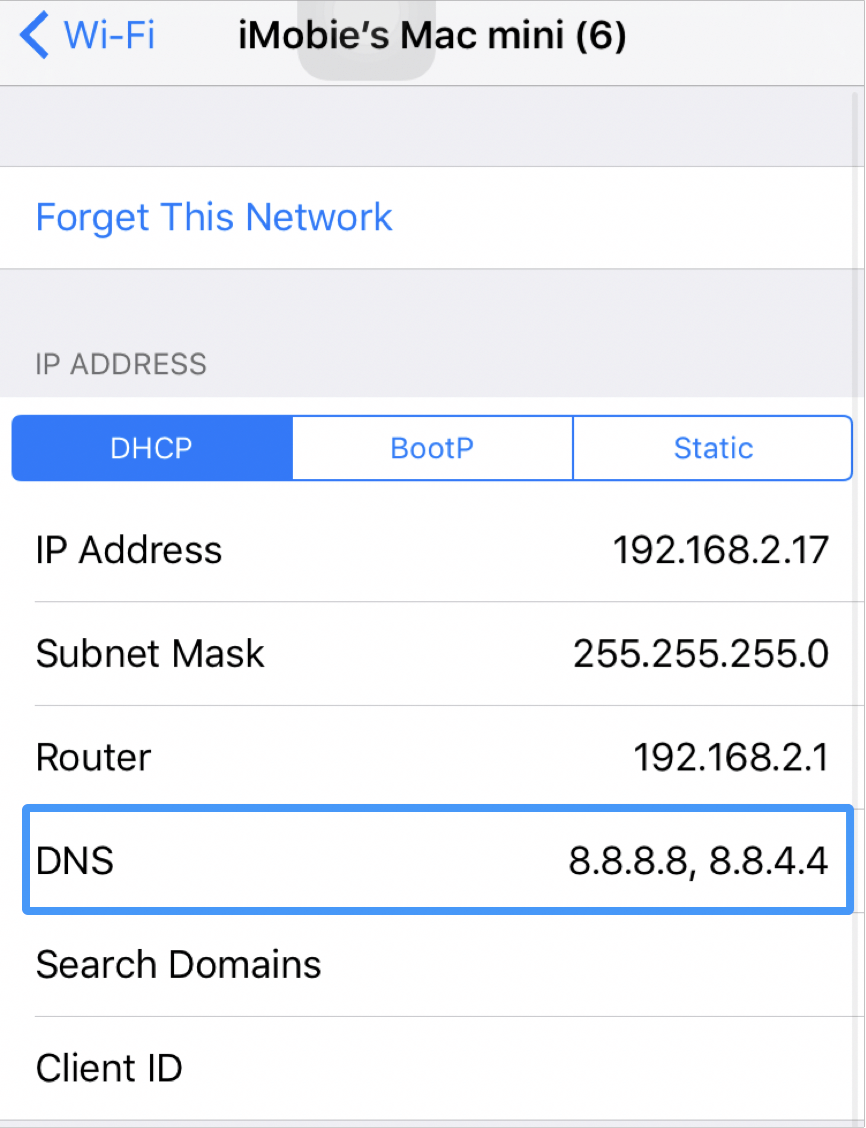
3. You can also try to change the default DNS to Google DNS with steps below:
Go to Settings > Wi-Fi > Find your Wi-Fi network > Click button > Tap on DNS > Delete the original DNS > Input 8.8.8.8,8.8.4.4 > Choose a Network to connect your iPhone again.
What to do if your iPhone won’t connect to Wi-Fi?
If your iPhone won’t connect to Wi-Fi, or does not pick up Wi-Fi, here are several possible solutions you can try to fix it.
1. Check your Wi-Fi router. If you find there is something wrong with your router, you can try to power off router and your iPhone for 30 seconds, and then turn them on to see if your iPhone can connect to Wi-Fi network.
2. Make sure Wi-Fi is on and you can see your network. You can turn it on in the Settings > Wi-Fi. If there is a blue checkmark next to a network name, it means that your iPhone has been connected to this network.
3. Input password if necessary.
4. Check all of your cables and connections.
5. Restart your iPhone and router.
6. Reset your network. It is easy to do so: open your iPhone > go to Settings > General > Reset > Reset Network Settings. This will reset Wi-Fi networks and passwords, cellular settings, and VPN and APN settings that you have used before.
What to do if your iPhone cellular data is not working?
If you are unable to use your iPhone cellular data, please kindly refer to the following instructions to solve your issue:
1. Turn Cellular Data off and on. Go to Settings > Tap Cellular > Turn it off > Then turn it on after a few seconds.
2. Turn Airplane Mode on and off. Open Control Center > Enable Airplane Mode > Turn it off after 30 seconds.
3. Check Carrier update. Go to Settings > General > About > See if carrier update is available.
4. Restart your iPhone. Please hold down the on/wake button and Home button until the Apple logo appears.
5. Reset Network Settings/All Settings. Go to Settings > General > Reset > Reset Network Settings/Reset All Settings.
6. Perform a Factory Reset. If you still cannot activate cellular data on your iPhone, you can try to set the device as new without restoring from backup.
How to save your cellular data on your iPhone?
Most of iPhone users have packed up the limited data plan on their devices to avoid paying overage fees. To save cellular data on your iPhone, you can turn off cellular data when you are not using it. Besides, you can also check the below tips to save your cellular data on iPhone effortlessly.
1. Turn off cellular data for some apps. There are some apps that can consume a lot of mobile data, so you can disable those hungry apps to reduce cellular data usage. It is easy to do so: go to the Settings app > tap Cellular > toggle off the switch next to the app which you do not want to use on mobile data.
2. Disable Background App Refresh. When the Background App Refresh is on, the apps can update and download in the background even when you are not using them. It will use your cellular data as well as drain the iPhone battery. To save your cellular data on your iPhone, please just turn it off to save your cellular data. Thus please go to the Settings app > General > Background App Refresh > Turn it off.
3. Disable Auto-Downloads and Updates on Cellular. This method can really help reduce cellular data usage. Go to Settings > iTunes & App Store > Turn off Use Cellular Data.
-
What to do if the Bluetooth on your iPhone is not working?
If the Bluetooth on your iPhone is not working, please check the following potential solutions to make Bluetooth workable on your iPhone.
1. Check your Bluetooth on iPhone and make sure it is turned on.
2. Confirm your iPhone and Bluetooth accessory are close to each other.
3. Turn off Bluetooth and restart your iPhone.
4. Repair iPhone you connect: Settings > Bluetooth > Choose your iPhone > Tap on the info button next to your iPhone > Tap on Forget This Device.
5. Reset Network Settings: Settings > General > Reset > Reset Network Settings.
-
How to free up space on iPhone?
For most iOS users, the most common problem they encounter is "Insufficient Storage to Download" on iPhone. In this article, it will offer several methods to free up space on your iPhone.
1. Back up camera roll on iPhone. Photos occupy tons of space on iPhone. To get rid of trouble is easy: Back up your photos and then delete them from your iPhone every couple of weeks.
2. Delete and reinstall apps. Those most frequently used apps generate a lot of caches, which take up large storage. In order to free up space, you can delete the apps caches and then reinstall them.
3. Remove unwanted songs on your iPhone.
4. Disable photo stream. Photo stream on your iPhone can automatically sync your latest 1,000 photos to all your iCloud devices when connected to Wi-Fi, which means these photos will take up at least 1GB space on your devices. So unless you need to share your photos from your iPhone to other devices, or you can turn it off to save space.
How to make your iPhone faster?
Although iPhone does an incredible job to work smoothly, it will inevitably get sluggish and slow after you use it for a long time. To make your iPhone faster than before, you can give our suggestions a try:
1. Turn off Automatic App Updates. Probably you never notice that this one could lead to iPhone running slowly. Turn it off by this: Settings > Scroll down > Tap on App and iTunes Stores > Toggle off Update option.
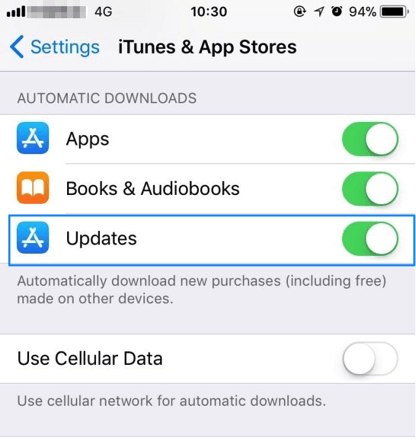
2. Turn off Automatic App Downloads. To make your iPhone faster, you can also turn off automatic app downloads with these steps: Settings > Scroll down > Tap on App and iTunes Stores > Toggle off Apps option.
3. Restart your iPhone every once in a while. To make your iPhone run faster, restarting could be a great choice.
4. Reset your iPhone completely. If none of above methods worked for making your iPhone faster, you can turn to resetting your iPhone.
-
What to do if the touch ID of your iPhone is not working?
If you are unable to activate touch ID or complete touch ID setup, please kindly refer to the following solutions to solve your issue:
1. Add another fingerprint: go to Settings > touch ID & Passcode > enter your passcode > tap on Add a Fingerprint to add another fingerprint.
2. Remove and re-add fingerprints: go to Settings > touch ID & Passcode > enter the passcode of your device > scroll down to find fingerprints > choose the fingerprint which you want to delete and then tap on Delete.
3. Force to restart your iPhone: hold down the Home and Wake/Sleep buttons at the same time for about 15-20 seconds until the Apple logo appears.
4. If a restart does not help, then try a restore. Please back up your device using iTunes firstly. Then, connect your iPhone to computer and launch iTunes to restore your iPhone.
How to find AssistiveTouch in your iPhone?
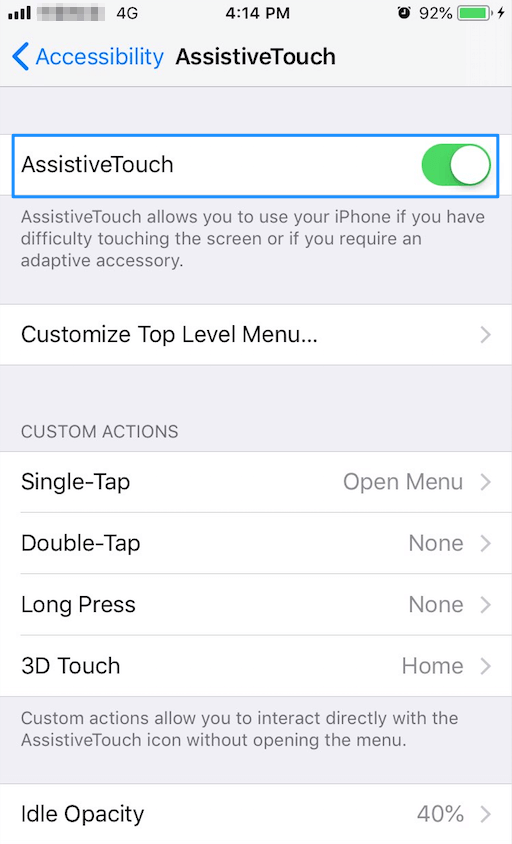
AssistiveTouch in iPhone can help users who have finger problems to manipulate iPhone. Meanwhile, this feature is also suitable for healthy iOS users to protect iPhone's Home button. Here's a brief introduction about how to open it on your iPhone.
Go to Settings > Find General > Tap Accessibility > Switch AssistiveTouch option on > Now you can see a transparent white dot on your iPhone’s screen.
What to do if your iPhone won’t turn on?
If the screen of your iPhone is black for a long time, and it can't be turned on at all, please go ahead to fix it with following methods:
1. Connect your iPhone to power source. If your iPhone won't turn on, you should plug it to power supply at first. Normally, after a few minutes, you should see the charging screen. But if you don't see the charging screen within an hour, please check your charger, connector and USB cable have been connected. If not, please try with other charger, USB cable or power adopter.
2. Try a hard reset: hold on Wake/Sleep button and Home button for 10 seconds until an Apple logo appears on the screen. This will forcibly restart your iPhone and fix this iPhone won't power on at most time.
How to put a message thread on Do Not Disturb in iOS 11?
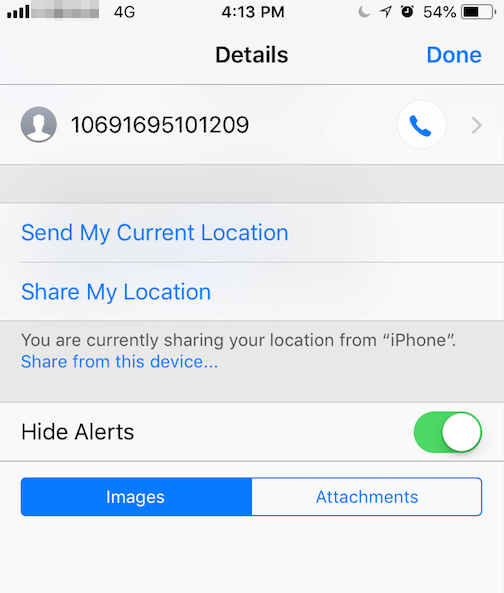
If you upgrade your iPhone to iOS 11, there is no Do Not Disturb option in the Messages app anymore. Thus if you want to stop a thread from notifying you every time somebody sends a text, please simply tap the Info button in the upper right of a thread and switch Hide Alerts into green.
How to share your current location in the Messages app on iPhone?
The Messages app on iPhone not only enables you to send texts, images, and videos, but also share your current location with others.
To do this, please kindly refer to the steps below:
1. Launch the Messages app.
2. Find the conversion you’d like to send your location.
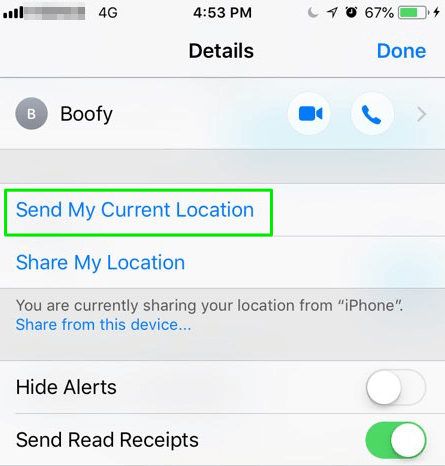
3. Tap on the Info button in the upper right of your chosen conversation.
4. Toggle on Send My Current Location and then your recipient(s) will receive a map with your location tagged.
