What Is Android Recovery Mode? How to Use Android Recovery Mode?
Android recovery mode is a term thrown around quite a lot, and if you are not sure what it means, this guide should tell you what this recovery mode is and how you can access it on your device.
Android Phone Tips
Android Backup Tips
Most Android phones have three modes: entering safe mode is to only load the essential files on your device, Odin mode is mainly used to flash a custom firmware, and recovery mode that you can use to troubleshoot issues on your phone.
Android recovery mode is actually a mode that you can reboot your device into and access many features to fix some problems and recover your phone or tablet.
Here we will take an in-depth look at this mode: Android recovery mode options will be explained, including how can you use recovery mode on Android. Besides, you will get detailed steps on how to enter recovery mode on different Android models. What’s more, we will show you how to fix Android recovery mode not working or stuck issue.
What Does Android Recovery Mode Mean?
If you want to know what is Apply update from ADB is, what does mount system mean, etc. in Android recovery mode, the following are the Android recovery mode options explained. Read the explanations and find those options in your phone’s recovery mode.
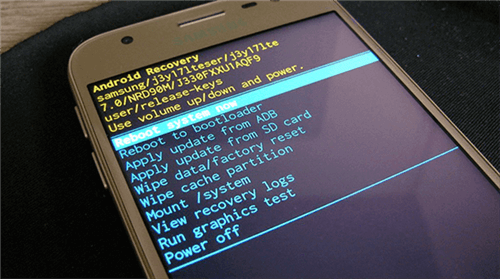
What Android Recovery Mode Is
Feature 1. Reboot system now
One of the options you will see in your recovery is a Reboot system now. As the name implies, this option allows you to turn off your device and then turn it back on in normal mode. When you tap this option, your phone will boot into normal mode.
This option is usually used when you have finished your tasks in recovery and you want to go back to normal mode.
Feature 2. Reboot to bootloader
On some phones, you will find an option that says Reboot to bootloader in recovery, and this option allows you to boot your phone into bootloader mode. Bootloader mode is different from normal and recovery mode and this mode allows you to flash certain files using ADB or other tools.
This also happens to be the mode that you use to unlock your phone’s bootloader.
Further Reading: What Does the Bootloader Do and How to Use it? >
You should only use the bootloader if you know what you are doing. Flashing a bad file can brick your phone.
Feature 3. Apply update from ADB
If you have downloaded a system update file as a ZIP on your computer, you can use recovery’s Apply update from ADB option to install that update file on your phone. Basically, you should have ADB installed on your computer and you can then use this option to push the file to your device and install it.
This option should only be used when you have no other options to get and install an update file.
Feature 4. Apply update from SD card
If you have downloaded a system update file directly on your phone’s SD card, you can use the Apply update from SD card option to install the update from the external storage on your phone. This works pretty much the same way as the above option but lets you pick a file from your local storage.
Feature 5. Wipe data/factory reset
Wipe data/factory reset is the option that helps you to fully reset your phone to the default settings. If you cannot reset your device because it will not turn on or you have other issues, you can reboot your phone into recovery and use this option to wipe off everything that is stored on your device.
Please make sure you have a backup of your Android data before using this option. This option will erase everything on your phone.
Feature 6. Wipe cache partition
Wipe cache partition allows you to remove all the cache files that have been sitting on the cache partition on your device. This is a quick and easy way to get rid of all your cache files in a couple of taps. You might want to use this option when there are cache-related issues on your phone.
Feature 7. Mount /System
Mount /System is normally not found in stock recoveries, but if you see it in your recovery, you can use it to mount your phone’s system storage and access the core files. If you want to make changes to the core system of your device, this is the option that you need to use.
Feature 8. View recovery logs
As the name implies, View recovery logs let you view all of the logs that have been made as a result of your activities in recovery mode. You should be able to find when you reset your phone and other details in this log file.
Feature 9. Power off
Reboot system now and Power off are two different options and the latter simply turns off your phone and does not turn it back on. If you have finished doing something in recovery but do not want to immediately go into normal mode, use this option.
What Can I Do with Recovery Mode Options?
1. Force Restart Android Phone
If you can’t restart your phone normally, use recovery mode and reboot your system now. This will fix some software glitches on your device by hard reboot. For example, safe mode won’t turn off, the phone is slow, apps keep crashing, etc.
2. Wipe Your Cache Files
If you are experiencing certain issues on your Android phone and you have been asked to clear your cache files, using recovery to clear the cache partition is a really good idea. This option wipes off all your cache files from your Android phone.
3. Reset Your Android Device
There are occasions when your phone refuses to turn on for various reasons. For those situations, you can use recovery to wipe off your device. This way, you can fully reset your phone including all your data, settings, and any other configurations you may have made on the phone.
4. Install an Update File
Sometimes, phone manufacturers push their updates in the format of a ZIP file. You cannot install these ZIPs from normal mode and you are going to have to use recovery mode to do that. With Apply update from ADB in Recovery mode, it takes your ZIP file as input and installs it on your phone the way it should be installed.
5. Flash a Custom ROM
If you are someone who enjoys tweaking their phone and its settings, you might like to flash a different ROM on your phone and see what it offers. Recovery mode allows you to flash various kinds of custom ROMs via reboot to bootloader. If you do not like a ROM, you can flash the stock ROM as well using the same recovery mode.
Further Reading: How to Flash and Reinstall Android OS >
6. Mount System Storage on your Phone
What the mount /system option in the recovery does is allow users to modify the system’s partition.
How to Enter Android Recovery Mode?
Although two different phones run the same Android operating system, the procedure to get into recovery mode can be different. Therefore, you need to learn the key combination that gets you into recovery mode on your phone. Here are the ways to reboot into recovery mode on some common Android phones.
Reboot Google Phones into Recovery Mode
Entering recovery mode on Google’s Nexus or Pixel phone is pretty easy. You need to first get into bootloader mode and then choose recovery mode from there. Here we show how can you enable Google pixel recovery mode:
- Turn off your phone.
- Press and hold down the Volume Down and Power buttons.
- Use Volume keys to select Recovery mode and press the Power button.
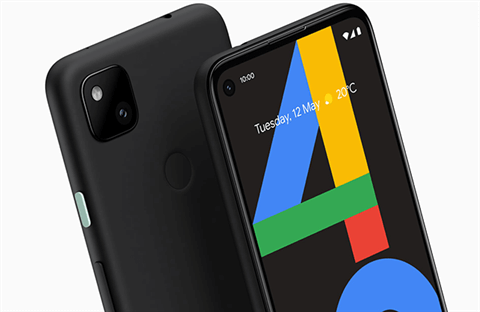
Recovery mode on Nexus and Pixel phones
How to Enter Samsung Recovery Mode
Bringing Samsung phones into recovery mode is again as easy as pressing a few buttons. You need to remember the key combo for your phone and you can quickly get into recovery mode anytime you want.
Here is a generic way for Samsung phones to enter recovery mode.
- Power off your phone.
- Press and hold down the Volume Down/Up, Power, and Home or Bixby keys at the same time.
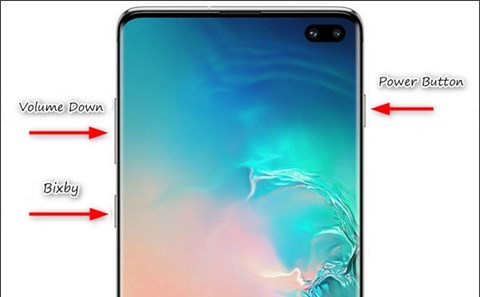
Samsung Recovery Mode
Access Recovery Mode on Motorola Phones
Motorola phones use bootloader mode to gain entry into recovery mode. You need to first boot into the bootloader and choose recovery from there. If you are not sure, the following will help you with that.
- Make sure your phone is turned off.
- Press and hold down Volume Down and Power buttons at the same time.
- Select Recovery mode to reboot into recovery mode.
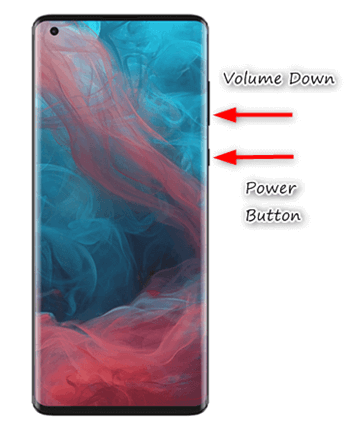
Recovery mode on Motorola devices
How to Use Recovery Mode on OnePlus Phones
OnePlus devices do not require you to use bootloader to get into recovery. You can simply hold down two buttons together and that will help you get into recovery on your phone.
- Ensure your OnePlus device is switched off.
- Press and hold down Volume Down and Power buttons simultaneously.

Recovery mode on OnePlus devices
Get Into Recovery on LG Phones
LG phones use a relatively difficult method to get into recovery. However, once you get used to it, you can get into recovery in a few seconds. Just make sure you hold and release the right buttons at the right time and you should not have any issues.
- Switch off your LG phone.
- Press and hold down Power and Volume Down keys at the same time.
- Release the keys when you see the LG logo and then press and hold down the keys again.
- Press the Power button and you will enter recovery mode.
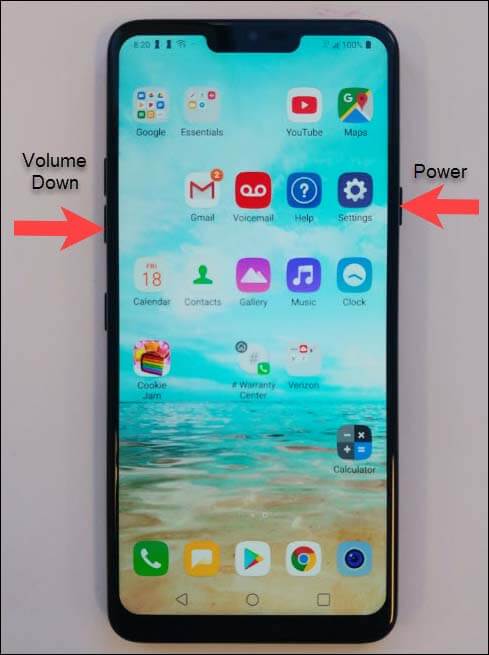
Recovery Mode on LG Phones
Boot Into Recovery on HTC Phones
On HTC devices, you must have Fastboot disabled in order to boot into recovery mode. It is pretty easy to disable that option and then to reboot your phone into recovery mode.
- Head into Settings > Battery on your device and disable Fastboot.
- Power off your phone.
- Press and hold down the Volume Down and Power buttons at the same time.
- Select Recovery to reboot into recovery mode.
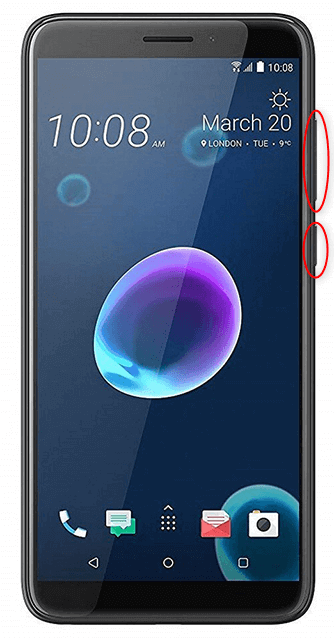
Recovery mode on HTC devices
Getting out of recovery mode is as easy as selecting an option. While you are still in recovery mode, choose either Reboot system now or Power off if it is available and you will be out of the mode.
What to Do if my Android Stuck in Recovery Mode?
Having learned the advantages and ways of entering Android recovery mode, give it a try when it is needed. Although how you boot to Recovery Mode depends on what phone you have, chances are that your Android phone is stuck in recovery mode or Android stuck in fastboot mode during the rebooting process. Android can be stuck into recovery mode for many reasons. When this happens, you may wonder how do I get out of Android Recovery Mode? No worries, to get your Android out of recovery mode without the power button, you can take DroidKit – Android Repair Tool a try.
DroidKit – Android Repair Tool
- Find the best solution for Android Recovery Mode stuck issue.
- Fix various Android OS issues and problems in minutes.
- Fix Android system issues without root.
- Revive dead Android devices in simple steps.
Free Download100% Clean & Safe
Free Download100% Clean & Safe
Free Download * 100% Clean & Safe
If you have a similar issue when using Android recovery mode, free download DroidKit now to get your Android phone workable again!
Step 1. Open DroidKit on your computer and click on System Fix Issues in the middle of the home screen.
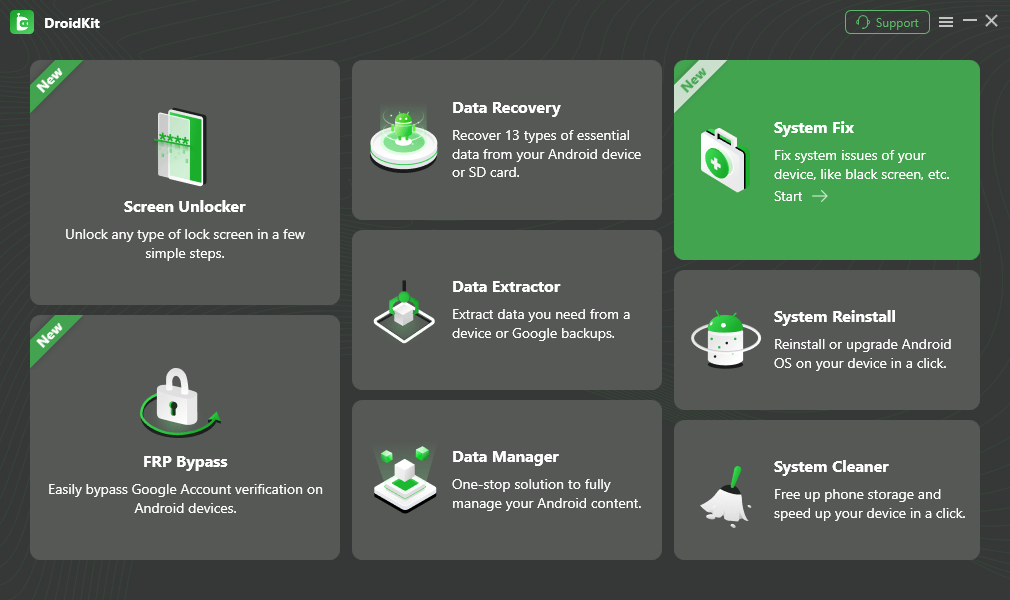
Click System Fix Function
Step 2. Connect your Android phone to the computer and hit Start to continue.
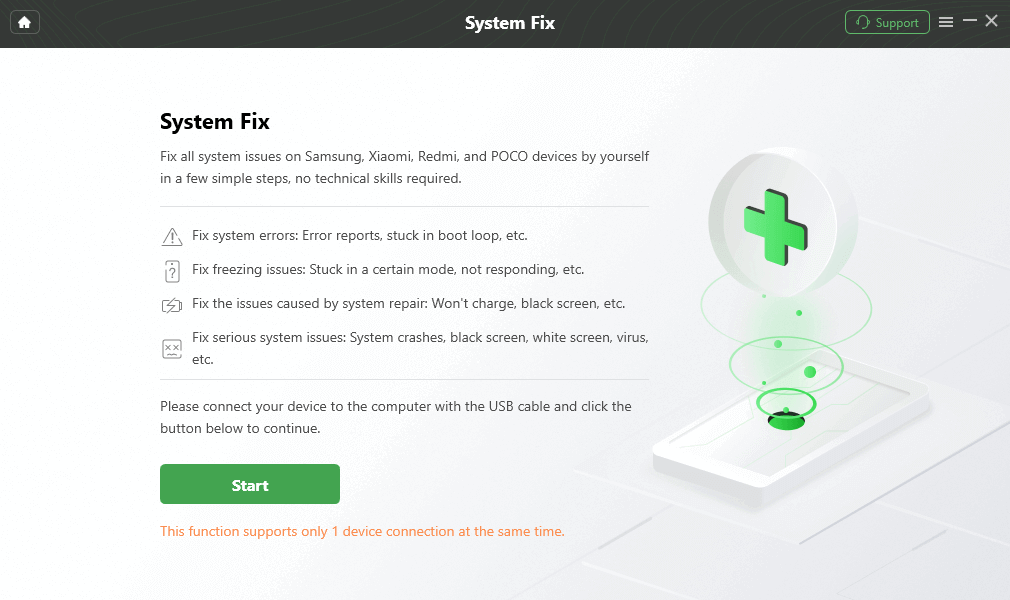
Start to Repair Samsung Phone
Step 3. Automatically, DroidKit will match the PDA code of your Android device > If you see the page below, click Download Now to get the firmware that is used for repairing.
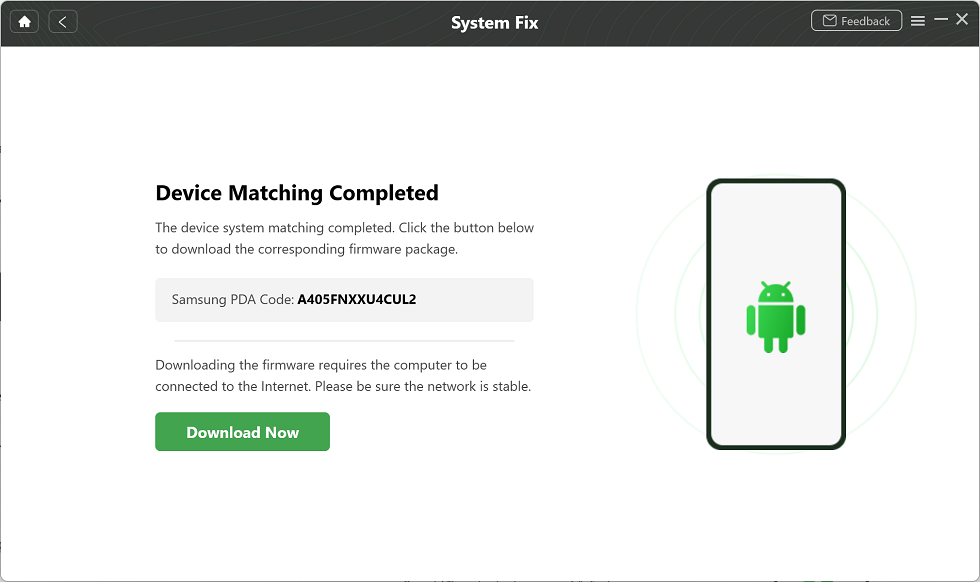
PDA Code Matched
If the program fails to match PDA code, follow the on-screen instructions to put your Android device into recovery mode.
Step 4. After downloading and verifying the firmware, it will automatically start repairing your Android system. Minutes later, you’ll see the System Fixed Successfully page.
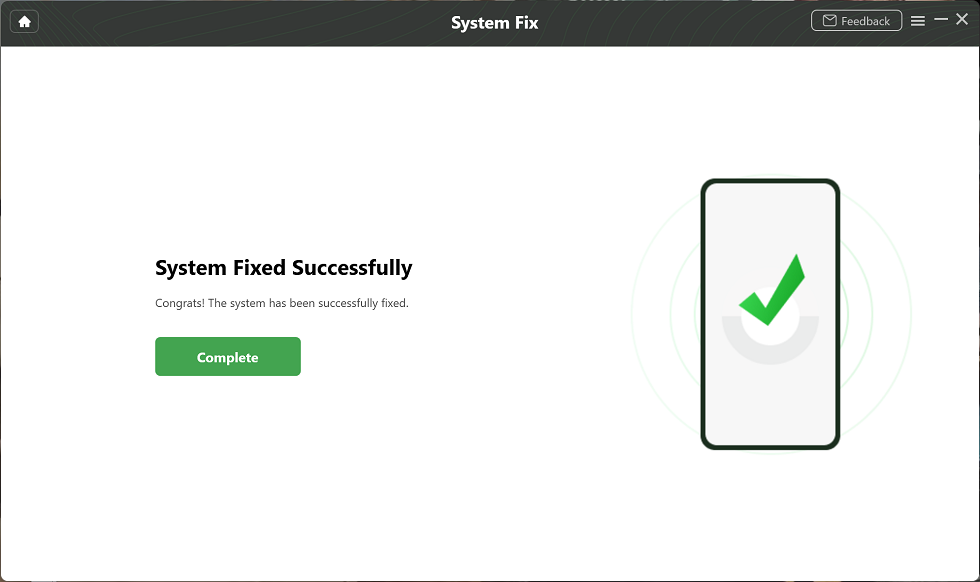
Completing the Repair Process
Is Recovery Mode Same as Factory Reset?
Android recovery mode is not simply same as a factory reset. You can enable a factory reset with Android recovery mode, also you can hard reboot the phone, flash a custom firmware, mount a partition, etc. with recovery mode. And you can check the detailed explanations as to the above.
The Bottom Line
We hope the guide above gives you a good explanation as to what Android recovery mode is, how you can use its various options, and how you can reboot your own Android phone into this mode. Finally, if you accidentally get stuck in recovery mode, Odin mode, etc., don’t worry, download DrordKit to help you get out of trouble quickly!
Product-related questions? Contact Our Support Team to Get Quick Solution >

