Sharpen Image: Make Photo Clearer Online Free
In this article, we are going to explore how to sharpen an image using an online tool – Fotor. We will also explore how you can do that on Windows. Plus, if you still need any other photo editing tools to enhance your image, you can have a look at the last section of this article. There, you can discover five of the best photo editing and designing apps.
Have you ever taken a picture and found it a bit blurry? Perhaps it didn’t capture the moment as sharply as you would have liked. Do you want to make it more clearer?
Well, we know how you can do that. Being a part of the digital world, everybody loves to capture moments and share them on social media. However, some people know how to edit and enhance the picture. On the other hand, some people want to learn it. But don’t worry!
This article is going to explore one of the essential editing elements, which is called sharpening. We will also learn how to sharpen an image with a detailed step-by-step guide. Let’s get started!
Table of ContentsHide
What Is Image Sharpening?
Before we get into the details of how to sharpen an image, let’s find out what it actually is.
You must have noticed some photos seem to pop off the screen with crisp details while others appear dull. That’s where image sharpening comes into play. You give your photo a special treatment to make it clearer and sharper. It’s like sharpening a pencil – you make the lines clearer and easier to see.
So, how does it work? Well, imagine your photo is made up of lots of tiny dots called pixels. Image sharpening makes some pixels darker and some lighter, especially around the edges. This makes the edges stand out more, like outlining them in a drawing.
Now that we know what image sharpening is, let’s find out why it matters.
Why Is Sharpening Image Important?
Well, Photos are like windows into special moments. But sometimes, those windows can get a little dusty, making the scene appear blurry or unclear. Image sharpening helps to clear away the haze. Though there are several benefits of sharpening an image, we will discuss the ones that matter the most.
- Visual Appeal: Crisp, well-defined edges make your subject stand out. Whether it’s a flower petal or your friend’s smile, sharpness adds that extra pop.
- Professional Look: Sharper photos give off a professional vibe. Whether you’re sharing them on social media or printing them for your wall, clarity matters.
- Storytelling: Clear images tell better stories. Imagine capturing the sparkle in your child’s eyes; sharpness brings those details to life.
Now that we have got your interest, let’s explore how to sharpen an image using a free online tool.
How to Sharpen an Image Online for Free
Various tools are available to help you sharpen your image. However, if you are looking for the most reliable and hassle-free tool, then look no further! Because Fotor – Online Photo Editor is the best answer when it comes to how to sharpen an image. It is an AI-powered tool with a lot of editing options to enhance your photos.
This online tool is so easy to use. Just a few clicks and your crip detailed images will be ready. Moreover, Fotor also allows you to increase resolution, recover lost details, improve contrast, and more. You can do a lot of enhancements to make the picture clearer in no time. Let’s find out what else Fotor has to offer to its users.
Key Features of Fotor
- AI technology: Fotor uses AI algorithms to enhance the image. It increases the quality and accuracy of the image when sharpening. So, you can enjoy high-quality output.
- Adjustable Strength: You can also adjust the strength of the sharpening effect. It ensures that you achieve the desired level of clarity without overdoing it.
- Real-Time Preview: Fotor provides a real-time preview feature. It allows users to see the changes made to their photos instantly. It makes it easier for them to fine-tune the sharpening effect.
- Online Access: Apart from the app, Fotor is also available online. This means users can access and use this amazing tool from any device. It is convenient for on-the-go editing.
- Additional Tools: In addition to image sharpening, Fotor provides a range of other editing tools. You can enjoy filters, effects, and adjustments. These tools allow you to enhance your photo further.
Now that we have explored the features of Fotor, let’s explore how to sharpen an image using this tool. You can follow the instructions given below to sharpen an image online using Fotor:
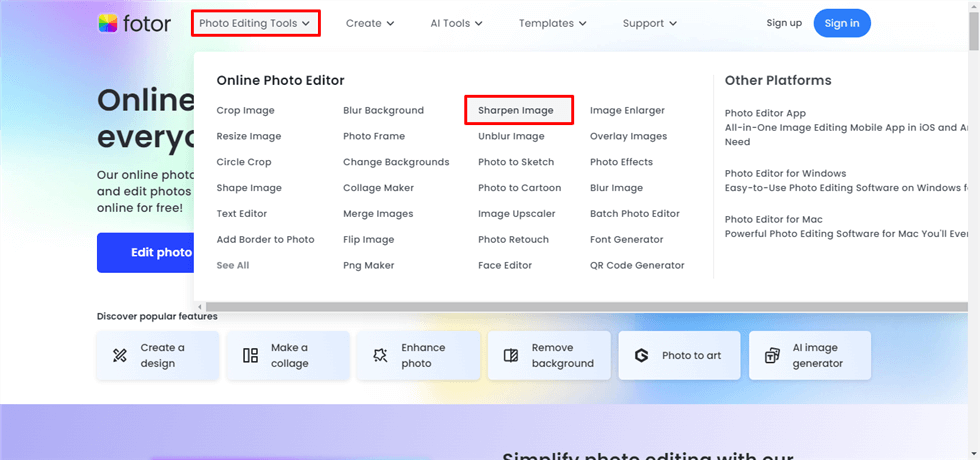
Step 1. Open Fotor on your laptop or PC. Move the cursor to Photo Editing Tools and select Sharpen Image from the options.

Open the Sharpen Image Option
Step 2. Click on Sharpen Image Now and select the picture that you want to enhance. Then click Start Now, and the sharpening process will start.

Click on Sharpen Image Now
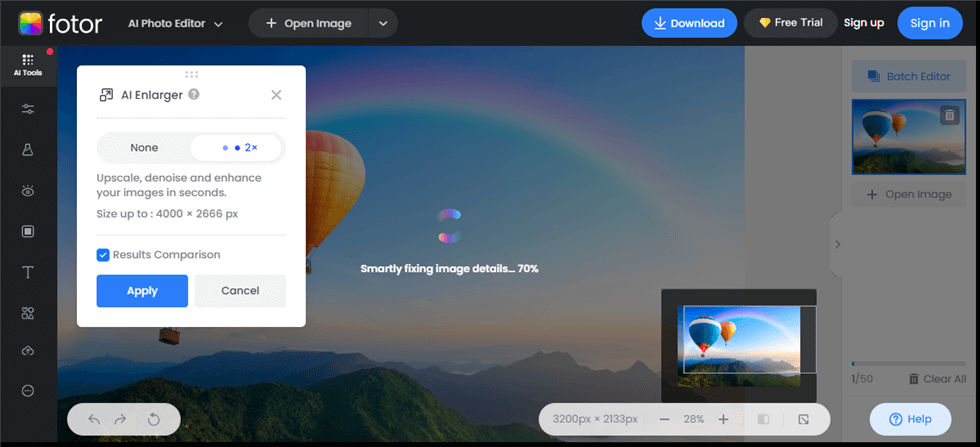
Step 3. Fotor will start to sharpen your image with its AI feature. It will take a few seconds until the process is finished.

Select the Picture You Want to Sharpen
Step 4. Once done, you will see the final image. You can click Download to get it in your gallery. Plus, you can also use other editing tools to enhance it further.

Final Image
However, if you do not have an internet connection, you can still sharpen your image. Let’s find out how to sharpen an image on Windows.
How to Sharpen an Image on Windows
Windows doesn’t offer any built-in feature to sharpen your image. However, you can use an alternative way like MS Word to do the task. Apart from the notes and writing features, this tool also allows you to sharpen your image on Windows. Are you wondering how? Let’s find out together!
You can follow the instructions given below to sharpen an image on Windows:
Step 1: Open the Microsoft Word app on your Windows.
Step 2: Now, click Insert > Pictures. Then, add a picture that you want to sharpen.
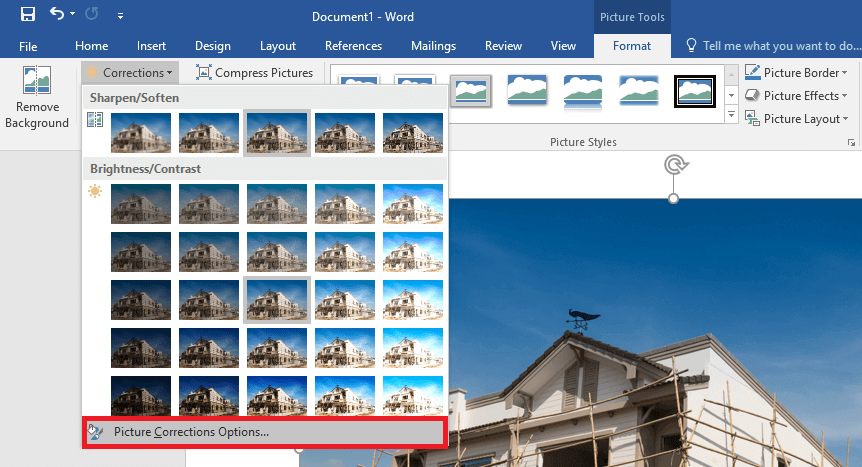
Step 3: Click Corrections on the top of the MS Word screen. Here, click Picture Correction Options.

Open the Picture Correction Options
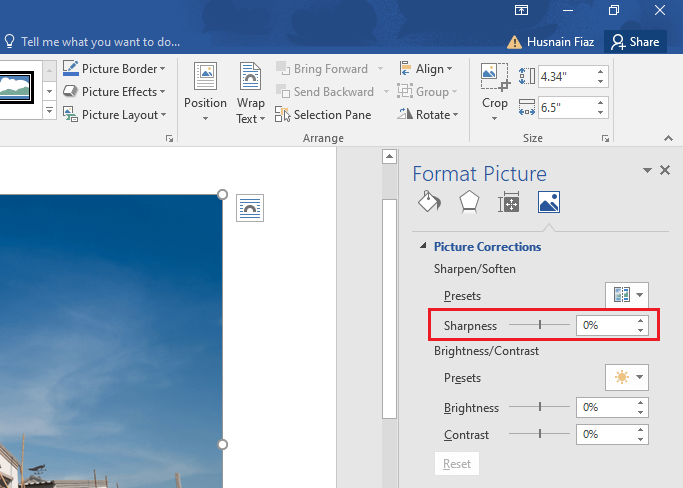
Step 4: You will see a window pop up on the right side of the screen. Adjust how much sharpen you want your picture to be.

Adjust the Sharpness Level
Step 5: Once you have successfully adjusted the sharpness level, right-click on the picture and select Save as picture.
So this is how to sharpen an image in Windows. However, if you don’t have MS Word or are unable to do it for any reason, you can explore other tools discussed in the next section.
Other Top Tools to Sharpen an Image
Various other tools can help sharpen an image. In this section, we will discover some of the common editing tools. Let’s explore them together!
1. Adobe
Adobe offers a range of powerful image editing software. You can use both Photoshop and Lightroom to enhance your image. These software are designed for professional users. However, a user with any skill level can use them and enjoy their editing journey.

Adobe Official Website
Key Features:
- It offers Customizable sharpening options for precise control.
- It has Advanced algorithms for professional-grade sharpening.
- You can Integrate it with other Adobe Creative Cloud apps for seamless workflow.
- You can also explore tutorials and community support for mastering sharpening techniques.
2. Canva
Canva has made the designers’ lives very easy. It is a versatile graphic design platform with basic image editing features. You can sharpen your image while you create graphics. Moreover, you can also use other tools like effects, filters, etc, to make your graphics look more good.

Canva Homepage
Key Features:
- It offers a user-friendly interface that is accessible to every user.
- Canva has a sharpening tool with adjustable intensity levels.
- You can also select templates and design elements from a vast library.
- It allows collaboration features for team projects.
- You can integrate Canva with social media platforms for easy sharing.
3. PicsArt
PicsArt is another editing and design tool for photographers and graphic designers. It also offers a variety of editing tools, including a sharpening feature. Users can use this tool directly from their phones to increase the clarity of their photos. PicsArt is also popular for its other editing features like cloning, blurring, and more.

Official Website of PicsArt
Key Features:
- It has a user-friendly interface designed for mobile use.
- You can enjoy the one-click sharpening option for quick enhancements.
- PicsArt offers creative filters and effects to complement sharpening adjustments.
- An in-app community for sharing and discovering editing tips and tricks.
4. PicWish
PicWish is an AI photo editing tool with advanced editing features. You can use this tool to sharpen your image with the help of AI algorithms. Moreover, PicWish offers a lot of other useful tools like background remover, photo enhancer, and more. The good thing is that you can use this tool online to sharpen your image without the need for installation.

Official Website of PicWish
Key Features:
- It has a simple and intuitive interface for hassle-free editing.
- You can use a sharpening tool with adjustable settings for fine-tuning.
- The Batch processing feature for sharpening multiple images at once.
- It offers Cloud storage for easy access to edited photos from any device.
- Compatibility with popular image formats for versatile usage.
5. Luminar Neo
Luminar Neo is also your answer to how to sharpen an image. It is also a professional-grade photo editing tool. It offers advanced editing features, including a comprehensive sharpening tool. This platform is designed for users to increase the clarity and details of their images.

Official Website of Luminar Neo
Key Features:
- It offers advanced sharpening algorithms for superior results.
- It is an AI-powered tool for intelligent sharpening adjustments.
- It allows integration with RAW files for maximum image quality.
- You can also use customizable presets for efficient workflow.
So, these are the tools that can help you sharpen your image. You can walk through their descriptions and the features they are offering. Then, you can decide which tool is the best fit for your requirements and needs.
Final Thought
In today’s visual-centric world, clear and sharp images are crucial for effective communication. With the availability of various online tools, sharpening images has become easier. No matter what your skill level or budget is, you can sharpen your image. We explored how to sharpen an image using an online platform along with five other tools to sharpen an image. So, next time you snap a photo that’s a bit blurry, don’t worry! With the right tools like Fotor, you can easily sharpen it and make it stand out. Happy editing, and may your images always be crystal clear!
Product-related questions? Contact Our Support Team to Get Quick Solution >

